

Appearance
Booking Settings
Configure your appointment types, fitting rooms, custom booking questions, checklist templates, and public booking link from Settings > Booking.
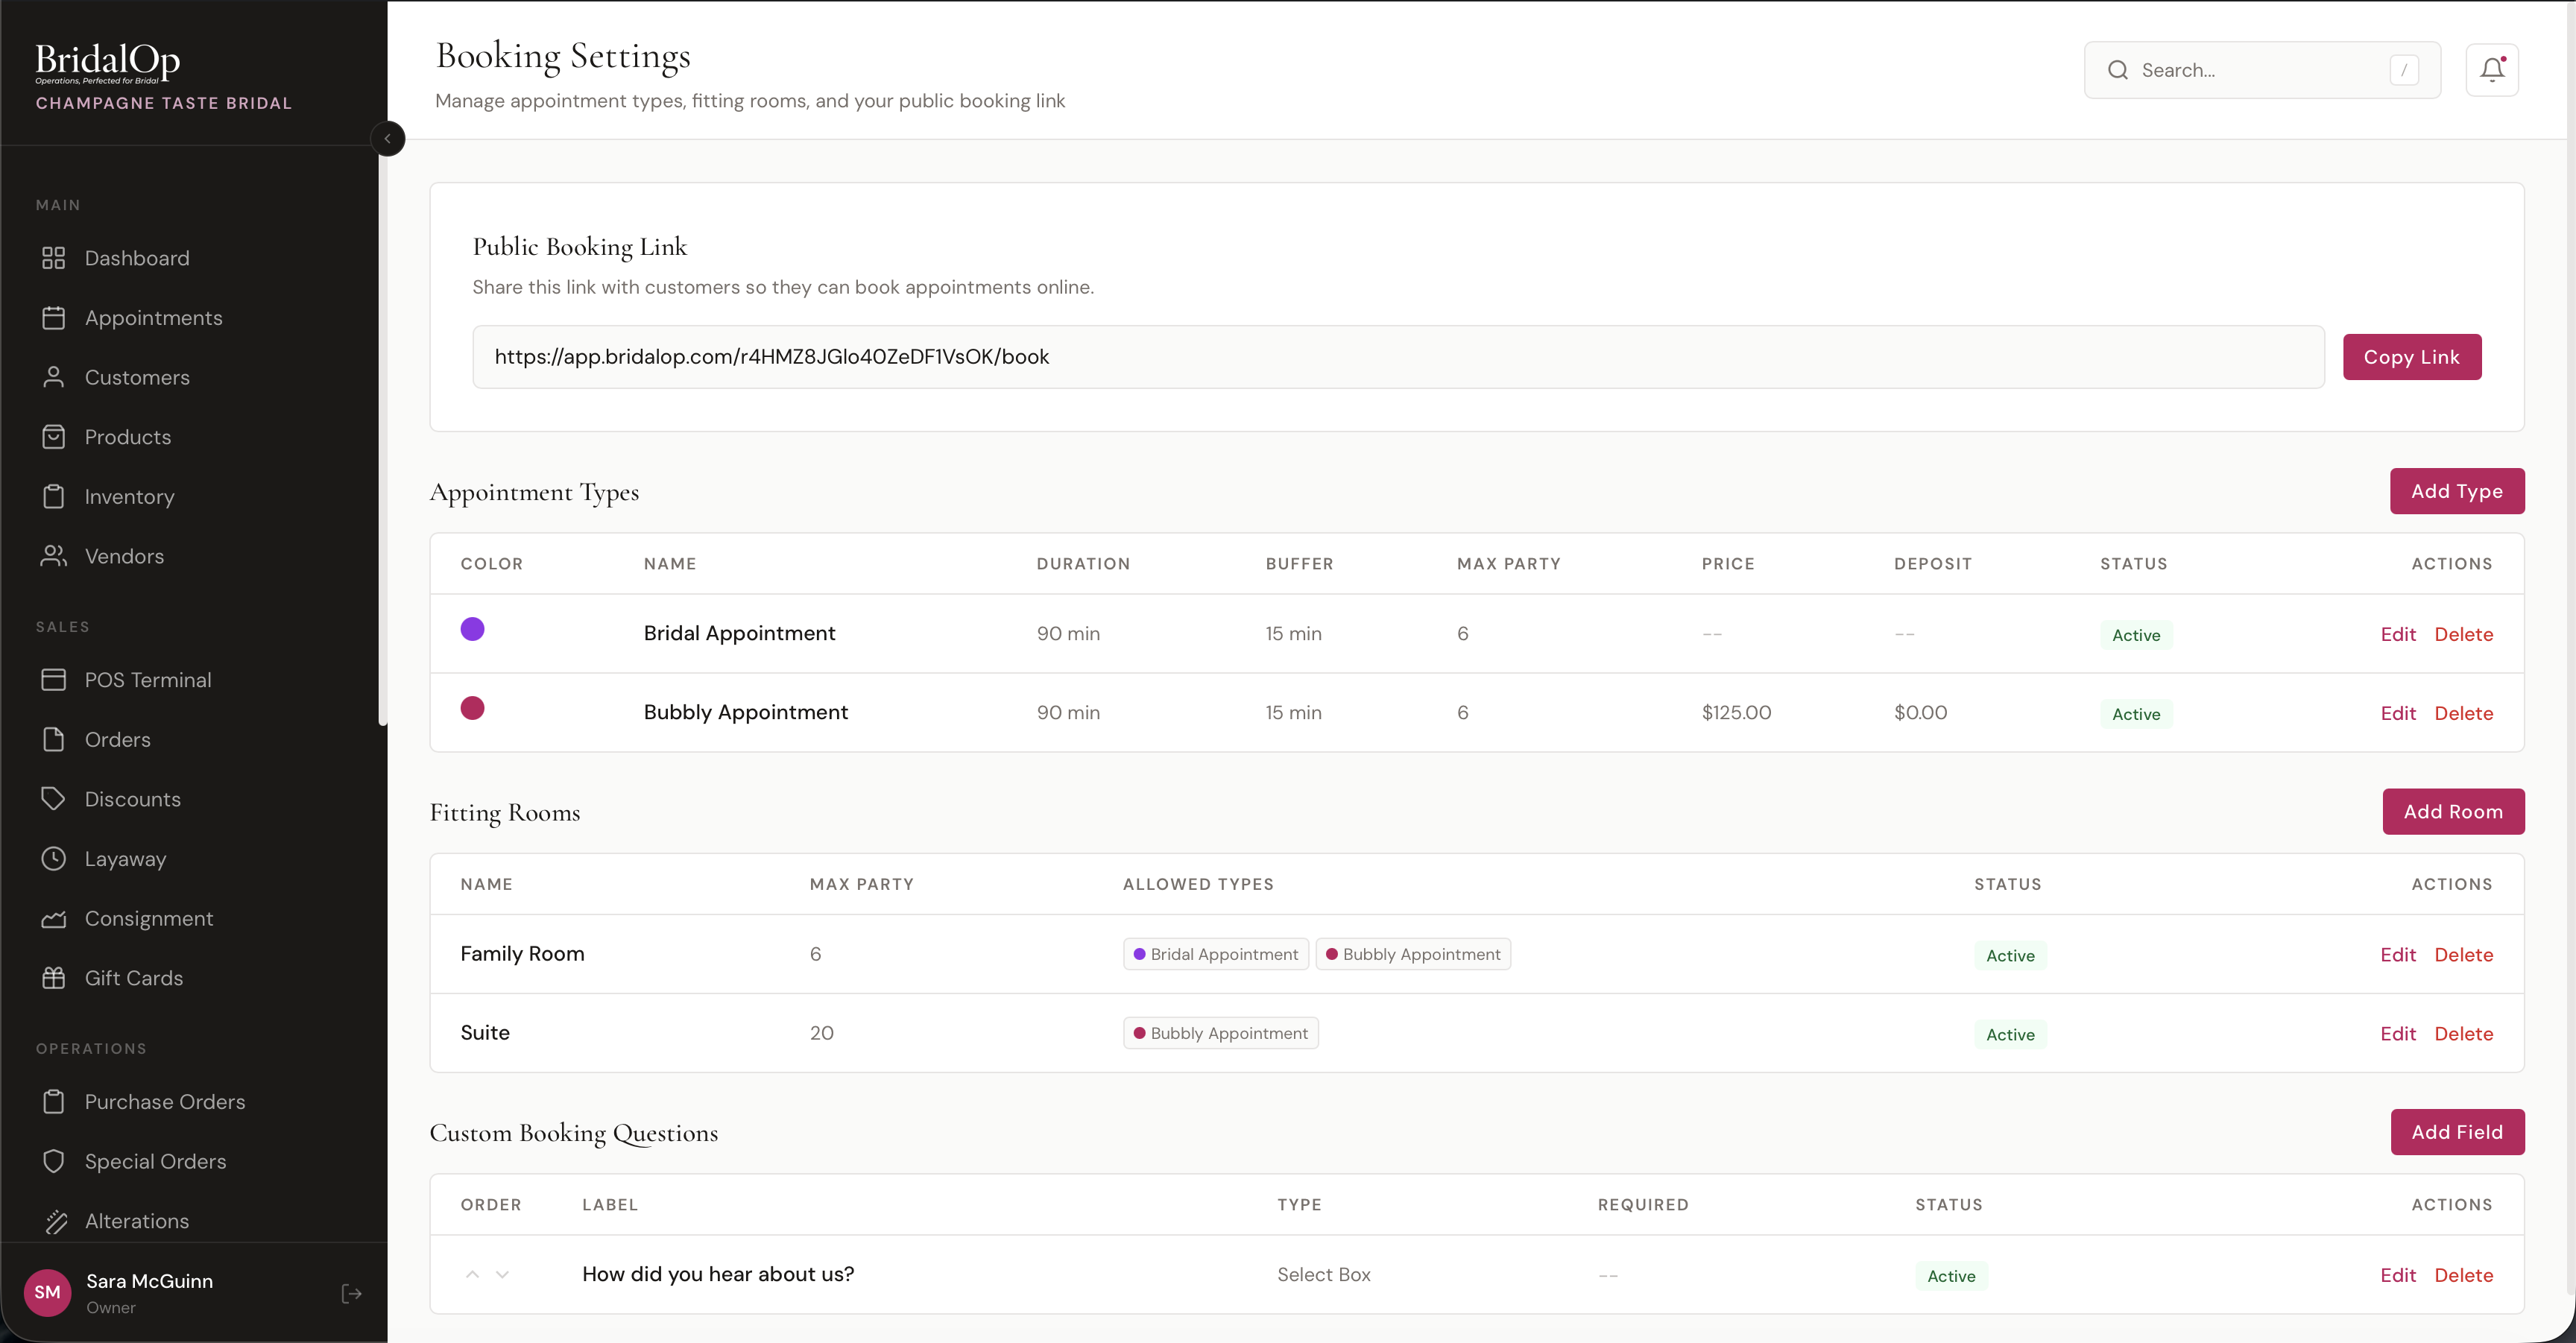
Page Layout
The Booking settings page is split into seven tabs. Everything that used to be one long scroll now lives behind one of these:
| Tab | What's on it |
|---|---|
| General | Minimum booking notice, buffer between appointments, when to ask about extras, letting clients cancel online |
| Booking Page | Public booking link, per-location links, embedding it on your website |
| Payments & Fees | Payment label, card on file for free appointments, cancellation & no-show fees, offer codes |
| Appointment Types | Appointment categories, appointment types, checklist templates |
| Questions | Custom booking questions |
| Fitting Rooms | Fitting rooms |
| Extras | Appointment extras |
Categories and types share a tab because a type belongs to a category and nobody sets up one without the other. Checklist templates sit with them for the same reason — a template is assigned to an appointment type.
The tab you're on is remembered in the address bar, so saving something leaves you where you were rather than throwing you back to General, and you can bookmark or share a link straight to a tab.
On a narrow screen the tab strip scrolls sideways rather than wrapping — swipe it.
The legacy /settings/appointment-checklist URL redirects here, to the Appointment Types tab.
The How Did You Hear / Source list lives on its own settings page — see How Did You Hear / Source below.
Public Booking Link
Settings → Booking → Booking Page tab The Public Booking Link card sits in the top-left of the page. Share this URL with customers — on your website, social media, emails, or anywhere else — so they can book appointments online. Click Copy Link to copy it to your clipboard (the button briefly changes to "Copied" as confirmation).
Per-Location Booking Links
When you have more than one location, a second card titled Per-Location Booking Links appears underneath the public link. Each location gets its own direct URL of the form .../book/at/{slug} with an inline Copy button, so you can post location-specific links wherever you market each boutique. Customers using a per-location link skip the location-picker step on the booking form and go straight to that location's calendar.
Each location's booking slug is auto-generated from the location name and managed on the Locations settings page. If a location is missing its slug, the card shows an amber notice in place of the URL with a link straight to that settings page so you can set one.
The Per-Location Booking Links card is hidden entirely for single-location boutiques.
Embed on Your Website
Settings → Booking → Booking Page tab A booking link sends a bride away from your website to finish booking. The Embed on Your Website card gives you a small piece of code that puts the booking form inside your own page instead — your header, footer and branding stay exactly where they are, and she never leaves your site.
It works on any website that lets you add code to a page: WordPress, Squarespace, Wix, Shopify, or a hand-built site.
Adding it to your site
- In Settings > Booking, find the Embed on Your Website card and click Copy Code under Booking form.
- In your website editor, add a Code / Custom HTML / Embed block wherever you want the booking form to appear.
- Paste the code and save.
That's the whole setup. The code looks like this:
html
<div data-bridalop-booking="your-booking-id"></div>
<script src="https://app.bridalop.com/embed.js" async></script>
The form appears in place, sized to fit your page, and grows and shrinks on its own as the bride moves through the steps — so you never end up with a scrollbar inside a scrollbar.
Everything works exactly as it does on your booking page: appointment types, real-time availability, your booking questions, deposits and card-on-file. Bookings land in BridalOp the same way.
One location per page
If you have more than one location, the card also lists a separate snippet for each one under One location per page. Put your downtown location's code on your downtown page and it books that location directly — the bride never sees a location picker, and an appointment can't land at the wrong shop.
These per-location snippets carry an extra data-location attribute:
html
<div data-bridalop-booking="your-booking-id" data-location="downtown"></div>
<script src="https://app.bridalop.com/embed.js" async></script>
Location snippets only appear once a location has a booking slug, which is set on the Locations page.
WordPress: exclude it from your caching plugin
If your site runs a caching or speed plugin — WP Rocket, Autoptimize, LiteSpeed Cache, W3 Total Cache and similar — do one thing before you move on.
Those plugins try to speed sites up by taking a copy of every script and serving their own minified version from your server. When they do that to the booking form's script, your site freezes a snapshot of it. Fixes and improvements we release never reach you, and nothing anywhere says so — the form keeps working, just as an older version, indefinitely.
Add this to your plugin's JavaScript exclusion list:
https://app.bridalop.com/embed.jsIn WP Rocket that's Settings → File Optimization → Excluded JavaScript Files. If Delay JavaScript Execution is switched on, add it to that exclusion box too. Other plugins call it "Never minify these files", "Exclude from optimisation", or "JS excludes".
Then clear the plugin's cache and hard-refresh your booking page.
To check it worked: view your page source and look for the script. It should read app.bridalop.com/embed.js. If it instead points somewhere inside your own site — something like /wp-content/cache/min/1/embed.js — the exclusion hasn't taken and you're still on a frozen copy.
Restrict to specific websites (optional)
By default the code works wherever you paste it, so there's nothing to configure before it will run.
If you'd rather it only load on sites you name, open Restrict to specific websites at the bottom of the card and add your domain — for example yourboutique.com. Once anything is listed, the form will refuse to load anywhere else.
WARNING
Once you add a domain, the form stops working on every site not on the list — including staging or preview versions of your own site. If your embed suddenly shows an empty space, check this list first.
Addresses are tidied up when saved, so yourboutique.com, www.yourboutique.com/shop and https://yourboutique.com all resolve correctly.
Starting on a specific appointment type
You can point an embed straight at one appointment type or category, which is useful when you want a "Book a Bridal Appointment" form on one page and "Book Alterations" on another. Add data-type or data-category with the relevant ID:
html
<div data-bridalop-booking="your-booking-id" data-type="12"></div>The bride starts at the calendar for that type instead of choosing from the full list. These attributes aren't generated by the Copy Code buttons — add them by hand.
Troubleshooting
| What you see | Likely cause |
|---|---|
| An empty gap where the form should be | You've listed allowed websites and this site isn't one of them |
| Nothing appears at all | Your page builder stripped the <script> tag — use a Code or Custom HTML block rather than a text block |
| The form appears twice | The code was pasted into two blocks on the same page |
| It works on your live site but not a preview | Preview and staging URLs count as different websites — add them to the list, or clear the list |
Payment Label
Settings → Booking → Payments & Fees tab The Payment Label card sits in the top-right of the page. By default, customers see the word "Deposit" everywhere a booking deposit is shown. Use this card to swap it for terminology that matches your boutique — for example, Booking Fee, Retainer, or Appointment Deposit.
| Field | Description |
|---|---|
| Label | Up to 50 characters. Placeholder shows example values (Booking Fee, Retainer, Appointment Deposit). Leave blank to fall back to "Deposit". |
A live preview under the field shows exactly how the label will read to customers — Shown as: "$50.00 {Label} required" — so you can see the result before saving.
The label appears in three places on the customer journey:
- The appointment type selection cards
- The review / summary step during booking
- The payment checkout page
Click Save to apply.
Card on File for Free Appointments
Settings → Booking → Payments & Fees tab This card sits in the top-right of the page, stacked underneath Payment Label. It's a single toggle that controls whether your free appointment types collect a card on file at booking time.
| Toggle | Behavior |
|---|---|
| Card on file for free appointments | When on, the public booking page asks the customer to save a card on file before confirming a free appointment. The card is stored on the customer's profile but not charged at booking. When off, free appointments confirm with no payment information collected. |
Useful for reducing no-shows on consultations and other free-of-charge appointments — the customer knows you have their card on file, even though nothing is charged today.
Paid appointments always save the card
You don't need this toggle on for paid appointments. Whenever a customer pays a deposit (or full price) at booking, BridalOp always saves that card to the customer's profile automatically — the toggle only affects free appointments where there's no payment to capture.
The saved card lives on the customer's profile under the Payment Methods tab and can be used for future invoice payments, layaway auto-charges, or POS Card-on-File charges.
Cancellation & No-Show Fees
Settings → Booking → Payments & Fees tab Two cards sit together here: whether a client may cancel online at all, and what it costs her when she does.
Both are off by default, and the fee is the only thing in BridalOp that takes money from a customer without a member of staff pressing a button — so it is deliberately hard to switch on by accident.
Letting clients cancel online
| Toggle | Behavior |
|---|---|
| Allow clients to cancel online | On by default. When off, the cancel button disappears from the manage link and the page tells her to call you instead. Rescheduling is deliberately still allowed — it keeps the slot, which is usually what you wanted anyway. |
Turning this off also turns off the automatic fee
The automatic cancellation fee only ever charges when a client cancels herself, through the link in her confirmation email. With online cancelling switched off there is no such cancellation, so the fee never fires whatever amount is set. Every cancellation reaches a member of staff instead, who can charge whatever the situation deserves from the appointment — see Charge cancellation fee.
What a cancellation costs
Three amounts, so late notice and plenty of notice aren't the same thing:
| Field | What it means |
|---|---|
| Short notice | Charged when she cancels inside the window below. Cancelling late costs you the slot. |
| Short notice is (hours) | How long before the appointment counts as short notice. 24 by default. |
| With more notice | Charged when she cancels earlier than that. 0 by default, meaning cancelling well ahead is free — which is how this behaved before the two tiers existed. |
She is shown what applies before she confirms the cancellation, along with a note that rescheduling is free. A fee is never charged twice for the same appointment, and a declined card never blocks the cancellation — losing a fee is recoverable, trapping a bride in an appointment she has cancelled is not.
Charging for a no-show
| Toggle | Behavior |
|---|---|
| Charge for a no-show | Off by default. When on, the amount you set is charged when a member of staff marks the appointment as a no-show. |
Unlike the cancellation fee this isn't automatic in the background — somebody has to decide it was a no-show first. The charge reports itself as a notification that stays put, including when it couldn't charge, because "no card on file" is exactly the thing you need telling.
A client is charged once: a bride who fails to turn up and whose appointment is then tidied away as cancelled doesn't pay both, and a fee already taken by hand blocks the automatic one too.
It needs a card on file
Nothing can charge a card that isn't there. Either take a deposit at booking, or turn on Card on File for Free Appointments so free consultations capture one too.
Watch your no-show rate
Making cancelling harder tends to convert some cancellations into no-shows — she avoids the awkward call by simply not coming. That's worse than a cancellation: the slot is never freed and nobody tells you. If your no-show rate climbs after turning these on, reopening online cancelling with a modest early-notice fee is usually the better answer than a bigger penalty.
Minimum Booking Notice
Settings → Booking → General tab The Minimum booking notice card controls how far in advance customers must book online. It's a single "Hours in advance" field — any time slot that falls inside the lead-time window is hidden on the public booking page, so customers can only pick slots that are at least that many hours out.
| Field | Description |
|---|---|
| Hours in advance | Whole number of hours (0–8760, i.e. up to a year). Defaults to 24 hours. Set to 0 to allow same-day online booking. |
A live line under the field spells out the effect — e.g. "Customers must book at least 24 hours ahead (1 day)" — or "Same-day online booking is allowed" when set to 0.
Staff aren't affected
The lead time only applies to the public booking page. Staff can always book any time on the calendar — including same-day walk-ins and phone bookings — regardless of this setting. See Appointments → Same-Day Staff Bookings.
Offer codes
Settings → Booking → Payments & Fees tab Codes your team applies to take an amount or a percentage off an appointment fee while booking someone.
Staff only. These never appear on your booking page and a customer cannot type one in — they exist for the phone call, not the website. If you want something a bride can redeem herself, that's Discounts, which work on orders rather than appointments.
The fee is still taken in full at the time of booking. It's simply a smaller full.
Creating one
Settings → Booking → Offer codes → New code.
| Field | Notes |
|---|---|
| Code | What your team types. Letters, numbers, dots, dashes and underscores — no spaces. Stored in capitals and matched however it's typed, so warmlead25 and WARMLEAD25 are the same code. |
| What is it? | A name for your own benefit, e.g. Warm lead call offer. It's what you'll recognise in the report. |
| Type | Percentage off, or a flat amount off. |
| Amount | The percentage or the dollars. |
| Expires | Optional. After this date the code stops working. |
| Limit uses | Optional. Total number of times it can be used across all staff. |
| Active | Untick to retire a code without deleting it. |
Using one
When a staff member books an appointment, there's an offer code field on the booking form. Type the code and the fee drops before anything is charged or invoiced.
A code that can't be used is refused rather than ignored, and it says which: expired, switched off, used up, or not a code at all. That's deliberate — charging someone the full fee because a code was mistyped is worse than making the typo obvious.
Things worth knowing
One offer per appointment. Applying a second replaces the first rather than stacking, so two codes can't quietly compound down to nothing.
An offer never makes a fee negative. A $50 code against a $25 appointment makes it free; it doesn't create a credit.
A code that's been used can't be deleted — switch it off instead. The record of what you gave away, and which offers brought people in, stays attached to it.
See Appointment Offers for what to do with the numbers.
Buffer between appointments
Settings → Booking → General tab Each appointment type carries its own buffer, set on the type itself. This card decides how far that gap reaches.
| Option | Behaviour |
|---|---|
| Per fitting room (default) | The gap is kept inside a room. With more than one fitting room, a second appointment can still start the moment another finishes — in the other room. |
| Between every appointment | No appointment can start within the buffer of another one finishing, whichever rooms they're in. |
Choose Between every appointment when the buffer is really about your consultants rather than the rooms. One person can't hand a bride her dress at noon and greet the next at noon, however many rooms are free.
Two appointments running alongside each other are still fine either way — your rooms are still used in parallel. It's the handover with no gap that's stopped.
Which one do I want?
If you have a single fitting room the two settings behave identically. The choice only matters from two rooms up.
Applies to both your public booking page and staff booking, so the two can't disagree.
Owner & Manager Alerts
Owners and managers can opt in to email alerts whenever a customer books, cancels, or reschedules online. These toggles live under Settings > General in a Manager & Owner Alerts group (alongside the other notification toggles), not on the Booking page — but they govern booking behavior, so they're worth knowing here.
| Alert | Fires when |
|---|---|
| New booking | A customer books through the public booking page |
| Cancelled by customer | A client self-cancels via their manage link |
| Rescheduled by customer | A client self-reschedules via their manage link |
Key details:
- The alert email goes to every active owner and manager, on top of the usual location inbox notification.
- These are opt-in — they stay off until you turn them on, so enabling the feature never silently starts emailing owners.
- They're email only.
How Did You Hear / Source
Managed on its own page at Settings > How Did You Hear / Source (/settings/customer-sources), this is a single tenant-editable list of the options for how clients found you — Google, Instagram, a bridal show, a referral, and so on. Rather than a fixed enum, you add, rename, reorder, and remove entries to match how your boutique actually markets.
To reorder, drag a row by the handle on its left. The order you set is the order clients see on the booking page and on the customer profile dropdown — so the sources you actually get people from can sit at the top instead of whatever happens to be alphabetically first.
The one list drives three places at once:
- The customer profile Source field (on the Create and Edit customer forms)
- The public booking page's "How did you hear about us?" question
- Source reporting and attribution
Because the profile field and the booking question both read from the same list, a source a client picks at booking flows straight onto their profile and into your source reports without any re-mapping. When a customer books online and picks a source, BridalOp records it on their profile (without overwriting a source that's already set).
Appointment Categories
Settings → Booking → Appointment Types tab Pinned at the top of the Appointment Types area, the Appointment Categories card lets you group your appointment types into bigger buckets — Bridal, Bridesmaid, Service Visits, etc. When at least one category exists, brides see a new What are you here for? step on the public booking page (after picking a location, before picking a type) and only see the types in the category they choose.
Each row shows the category name with a drag handle on the left for reordering, an Edit link, and a Delete link. Click Add Category in the section header to add a new one.
| Field | Description |
|---|---|
| Name | Customer-facing name shown on the booking step (e.g., "Bridal", "Bridesmaid", "Service Visits") |
Once categories exist, every appointment type can be assigned to one via a new Category dropdown on the type form (see below).
Backward compatible
If you don't create any categories, the public booking page keeps its existing flat list of appointment types — no extra step. Categories only kick in once you add at least one.
Uncategorized types automatically surface under a synthetic Other bucket on the public booking step whenever at least one category exists. So you can roll out categories incrementally without losing any types.
Appointment Types
Settings → Booking → Appointment Types tab Appointment types define the services you offer (e.g., "Bridal Appointment", "Bridesmaid Fitting", "Bubbly Appointment"). Each type controls how long the appointment lasts, how it appears on the calendar, and what the customer sees when booking.
The Appointment Types section displays as a card grid rather than a wide table — one card per row on narrow screens, two cards per row at the xl breakpoint and above. Each card shows:
- A color dot + the appointment type name
- An Active / Inactive badge
- A Staff only badge when Show on public booking page is unchecked (see Public visibility below)
- A row of stats: duration in minutes, buffer in minutes, and max party size
- An optional second row with Price and Deposit (only shown when at least one is set)
- Edit and Delete buttons
The card itself doesn't show the assigned checklist template — that's set on the edit form (see below) and surfaces on the appointment slide-over once the appointment exists.
Click Add Type in the section header to add a new appointment type.
Creating & Editing an Appointment Type
Click Add Type or Edit to open the form. It's laid out in two columns — what the appointment is on the left (name, description, photo, category, colour) and how it behaves on the right (duration, buffer, party size, price, deposit, included guests, and the flags). Available Days and the date range run full width underneath. On a narrow screen it collapses to a single column.
| Field | Required | Description |
|---|---|---|
| Name | Yes | Display name (e.g., "Bridal Consultation") |
| Description | No | A sentence or two brides see when picking this type on the booking page. Up to 300 characters. |
| Photo | No | An image shown next to the type on the booking page. JPG, PNG or WEBP, up to 2MB. |
| Color | Yes | Pick from 10 preset colors or use the color picker for any custom hex color. This color appears on calendar events and the booking page. |
| Duration (minutes) | Yes | How long the appointment lasts (15–480 minutes) |
| Buffer (minutes) | Yes | Gap held either side of the appointment before another can start (0–120 minutes). Cleanup, transition, or simply a breath between brides. How far this gap reaches is set by Buffer between appointments. |
| Max Party Size | Yes | Maximum guests allowed (1–20). Customers can select their party size up to this number when booking. |
| Price | No | Service price displayed to customers on the booking page. This is informational — it doesn't trigger payment on its own. |
| Deposit to Book | No | Amount charged at booking time. If greater than $0 and a payment gateway is connected, customers are prompted to pay before the booking is confirmed. If $0, no payment is required. Cannot exceed the price. |
| Category | No | Pick an Appointment Category for this type. Leave blank to surface this type under the synthetic Other bucket on the public booking page (only when at least one category exists). |
| Available Days | No | Restrict this appointment type to specific days of the week (Mon–Sun). Leave all unchecked to allow every day. Restricted days are greyed out on the booking calendar. |
| Available From / Available Until | No | An optional bookable date window. Outside this range the type isn't offered — set an Available From date and it only becomes bookable on/after that date; set an Available Until date and it stops being bookable after it. Leave both blank for "Bookable on any date". Handy for seasonal offerings or trunk-show types that should only appear for a limited run. |
| Included Guests | No | How many guests are covered before an auto-calculated extra-guest charge applies. Only does anything when you've flagged an extra as the auto extra-guest charge and attached it to this type. |
| Requires Fitting Room | Yes | Controls whether this appointment type needs a fitting room for availability. See the Fitting Rooms section below for details. Default is on. |
| Prom appointment | No | Asks for her school, year and prom date on the booking form. Only appears when the Prom module is on — see Prom appointments below. |
| Show on public booking page | — | When unchecked, this type stays usable by staff (calendar, manual appointment creation) but is hidden from the public booking page. Use this for types like Pickup, Alterations Fitting, or Trunk Show that staff schedule manually. The card on the Appointment Types list shows a Staff only badge when this is off. Default is on. |
| Active | — | Inactive types are hidden from the public booking page and staff dropdowns. (Use Show on public booking page if you only want to hide from the public side.) |
Attaching a checklist works the other way round
There's no checklist field on the appointment type. You pick the appointment types when you create or edit a Checklist Template, and one template can cover several types at once.
Prom appointments
Tick Prom appointment on a type to have the public booking form ask for the girl's school, year and prom date. The tick box only appears when the Prom module is switched on.
It's a flag on the type rather than a shop-wide setting, because a boutique runs bridal consultations and prom appointments out of the same diary and shouldn't be asking a bride what school she goes to.
Public Visibility
Two flags control where an appointment type shows up:
| Flag | Hides from public booking | Hides from staff |
|---|---|---|
| Active off | Yes | Yes |
| Show on public booking page off | Yes | No — staff can still pick it manually |
When you turn Show on public booking page off for every appointment type, the public booking page falls back to an empty-state message: "Online booking is currently unavailable — Please call the boutique to book your appointment. We'd love to hear from you."
Price vs. Deposit to Book
- Price is the total cost of the service. It's displayed to the customer for transparency but doesn't require payment at booking time.
- Deposit to Book is the amount charged when the customer books online. If a payment gateway is connected and the deposit is greater than $0, the customer must pay before the booking is confirmed. If the deposit is $0, no payment is required.
The deposit amount cannot exceed the price. Price and Deposit to Book appear as side-by-side fields on the appointment type form.
The customer-facing label for the deposit amount is configurable via the Payment Label card at the top of the page.
Appointment Extras
Settings → Booking → Extras tab Extras are the things a customer can add to her appointment when she books — a champagne toast, an extra guest, an after-hours fee, a private appointment. Each one is priced, optionally shown on your public booking page, and attached to whichever appointment types it makes sense for.
Setting one up
| Field | What it does |
|---|---|
| Name and Description | What she sees when choosing |
| Photo | Optional image shown beside it on the booking page |
| Pricing | Flat — one charge however many. Per unit — charged per guest, per glass, whatever you name it |
| Quantity label and Max quantity | Only for per-unit extras. The label is the word she sees ("guests"); the max caps how many she can add |
| Payment timing | With the deposit — charged at the time of booking. At the appointment — recorded now, collected in the shop |
| Show on the public booking page | Untick to make it staff-only, for things like an after-hours fee you apply yourself |
| Appointment types | Which types offer it. An extra with no types attached never appears |
Extras are drag-reorderable; the order you set is the order customers see.
Auto extra-guest charge
One extra per boutique can be flagged as the auto extra-guest charge. Its quantity is worked out for you — the customer's party size minus the appointment type's Included Guests — and she can't change it. Only one extra can be flagged this way at a time.
Takes the whole shop
Tick Takes the whole shop on an extra and it stops being a charge and starts being a rule. Built for a private appointment, but it's a setting on the extra, so a trunk show or anything else can use it without asking us.
It works in both directions:
- Choosing it only offers times when nothing else at the location is booked. Not "a room is free" — nothing at all.
- Once it's on the books, that time stops being offered to anyone else, however many fitting rooms are still empty.
The second half is the one that matters. Without it an extra called "Private Appointment" charges for privacy without delivering it, and a second customer can book the room next door.
If you turned a fitting room off to fake this
Some boutiques deactivate a second fitting room so nothing can book alongside a private appointment. You don't need to any more — turn the room back on, or you're running at reduced capacity every day of the week.
Your staff are the exception. They still see those times, can book into them, and get an amber warning telling them what they've done rather than being stopped. Adding a whole-shop extra to an appointment that already has neighbours warns in the same way — it charges for privacy, it doesn't move anybody.
When to ask about extras
Settings → Booking → General tab Where the extras step sits in your public booking page.
| Option | Behaviour |
|---|---|
| After she picks a date and time (default) | She chooses her time first and is offered extras afterwards |
| Before she picks a date and time | She chooses her extras first, so the calendar can take them into account |
This only really matters if one of your extras takes the whole shop. Asking first means she's only ever shown times that can actually be private. Asking afterwards means she can pick 11:00, add a private appointment two steps later, and be told that time won't work — which is a worse moment to find out.
Extras always come after she's picked an appointment type, whichever you choose, because which extras exist depends on the type.
Fitting Rooms
Settings → Booking → Fitting Rooms tab Fitting rooms represent the physical spaces in your boutique where appointments take place. They control how many appointments can happen at the same time — BridalOp uses fitting room availability to calculate which time slots to offer customers.
When to Use Fitting Rooms
Use fitting rooms when:
- Your boutique has a limited number of private rooms or suites
- Appointments need dedicated space that can't overlap
- Different rooms accommodate different party sizes
- Certain rooms are only suitable for certain appointment types
Don't use fitting rooms when:
- Appointments don't require a specific physical space (e.g., phone consultations)
- You want unlimited concurrent bookings for a service
For appointment types that don't need a room, uncheck "Requires Fitting Room" on the appointment type. Those appointments will be available based purely on business hours and calendar blocks, with no room constraints.
How Fitting Rooms Affect Availability
When a customer books an appointment type that requires a fitting room, BridalOp checks:
Are there eligible rooms? — rooms at the right location, that are active, that allow this appointment type, and that fit the party size
Are any of those rooms free? — no existing appointment in that room during the requested time (including buffer)
Bookings made on your public page don't pick a room. They still take up a room's worth of capacity, so two online bookings at the same time fill a two-room boutique and a third customer isn't offered that slot. Your team assigns the actual room afterwards, from the appointment.
If all eligible rooms are occupied during a time slot, that slot won't be shown. If no eligible rooms exist at all for an appointment type (e.g., no rooms allow "Bridal Fitting"), no slots will be available — the customer will see "No available time slots for this date."
Table Columns
| Column | Description |
|---|---|
| Name | Room name (e.g., "Family Room", "Suite") |
| Max Party | Maximum party size the room can accommodate |
| Allowed Types | Which appointment types can use this room (shown as colored badges) |
| Status | Active or Inactive |
| Actions | Edit and Delete |
Creating & Editing a Fitting Room
Click Add Room or Edit to open the form.
| Field | Required | Description |
|---|---|---|
| Name | Yes | Room display name |
| Location | Yes | Which boutique location this room belongs to |
| Max Party Size | No | Maximum number of people the room fits. If left blank, there's no limit. Rooms with a max party size smaller than the customer's party will be excluded from availability. |
| Allowed Appointment Types | No | Check the appointment types this room can host. Leave all unchecked to allow all types. If you check specific types, only those types can be booked into this room. |
| Active | — | Inactive rooms are excluded from availability calculations and room selection |
Example Setup
A boutique with two rooms:
| Room | Max Party | Allowed Types |
|---|---|---|
| Family Room | 6 | Bridal Appointment, Bubbly Appointment |
| Suite | 20 | Bubbly Appointment |
- A Bridal Appointment for a party of 4 → only "Family Room" is eligible
- A Bubbly Appointment for a party of 10 → only "Suite" is eligible (Family Room only fits 6)
- A Bubbly Appointment for a party of 4 → both rooms are eligible, so two can run concurrently
Custom Booking Questions
Settings → Booking → Questions tab Add custom fields to your booking form to collect additional information from customers — like "How did you hear about us?", dress preferences, wedding venue, or any other details you need.
Table Columns
| Column | Description |
|---|---|
| Order | Up/down arrows to reorder the field's position on the form |
| Label | The question or field label |
| Type | Field type (Text Field, Select Box, Checkbox, etc.) |
| Required | Whether the field is required on the public booking form |
| Status | Active or Inactive |
| Actions | Edit and Delete |
Reordering
Use the ↑ and ↓ arrows in the Order column to change where a field appears on the booking form. Fields at the top of the list appear first on the form. The order updates immediately when you click an arrow.
Creating & Editing a Field
Click Add Field or Edit to open the form.
| Field | Required | Description |
|---|---|---|
| Label | Yes | The question text (e.g., "How did you hear about us?") |
| Field Type | Yes | The type of input (see all types below) |
| Placeholder | No | Hint text inside the field (e.g., "e.g., Instagram, Google...") |
| Default Value | No | Pre-filled value when the form loads |
| Options | For Select/Multi-Select | Comma-separated list of choices (e.g., "A-Line, Ball Gown, Mermaid") |
| Required | No | When checked, the field is marked with a red asterisk and must be filled before submitting |
| Active | — | Inactive fields are hidden from both the public booking form and staff appointment creation |
| Show only for specific appointment types | No | When enabled, the field only appears when the customer selects one of the chosen appointment types (see Conditional Fields below) |
Field Types
| Type | Renders As | Best For |
|---|---|---|
| Text | Single-line text input | Short answers (name, reference number) |
| Phone | Phone number input | Phone numbers |
| Number | Number input | Dress size, guest count |
| Textarea | Multi-line text area | Detailed notes, special requests |
| Select | Dropdown (single choice) | "How did you hear about us?", dress style, size |
| Multi-Select | Checkboxes (multiple choices) | Service add-ons, preferences, multiple selections |
| Checkbox | Single yes/no checkbox | Terms agreement, opt-ins |
| Address | Autocomplete address field | Wedding venue, delivery address |
| File | File upload | Reference photos, inspiration images |
| Hidden | Not visible to customer | Internal tracking values (UTM parameters, source codes) |
Conditional Fields
Check "Show only for specific appointment types" to make a field appear only for certain appointment types. For example:
- A "Dress Style Preference" select field that only shows for Bridal Appointment — not for Bridesmaid or Bubbly appointments
- A "Number of Bridesmaids" number field that only shows for Bridesmaid Fitting
When the condition is enabled, a list of your active appointment types appears as checkboxes. Select which types should show this field. If no types are selected (or the condition is off), the field shows for all appointment types.
Where Custom Fields Appear
Public booking form — customers see the fields after selecting their appointment type, date, and time. Required fields must be filled before they can proceed to review and confirm their booking.
Staff appointment creation — the same fields appear under a "Custom Fields" section when staff create appointments manually. However, all custom fields are optional for staff regardless of the required setting — this gives your team flexibility to skip fields when creating appointments on behalf of customers.
Customer profile — custom field responses are stored with the appointment and visible when viewing appointment details.
Profile Fields on the Booking Page
Separate from these per-appointment Custom Booking Questions, any customer profile field marked Show on booking also renders on the public booking form. Those answers save straight onto the customer's profile (not just the appointment), so information you collect once at booking is available everywhere the customer record appears. Required on-booking profile fields must be filled before the customer can submit.
When the booking form includes an Address question, the address the customer enters is written to their profile's address fields as well — without overwriting an address they already have on file.
The staff-facing read-only summary of everything the customer submitted at booking is described under Appointments → Booking Answers.
Checklist Templates
Settings → Booking → Appointment Types tab Checklist Templates are reusable lists of tasks that staff tick off during an appointment — fit-check steps, accessory pairing, photo capture, payment collection, anything that should be consistent every time. Define a template once and assign it to as many appointment types as you want.
The Checklist Templates card sits in the bottom-right of the Booking settings grid. The card lists every template you've created as a single row each, showing:
- The template name
- A subtitle reading
{N} task(s) · {assigned appointment type names}so you can see at a glance how many tasks the template has and which appointment types use it - Edit and Delete controls on the right
If you haven't created any templates yet, the card shows an empty-state message: "No templates yet. Add one and assign it to an appointment type."
Click Add Template in the card header to add a new one.
Creating a Template
Clicking Add Template (or Edit on an existing row) opens the template modal. The modal uses a 2-column layout:
| Side | Contents |
|---|---|
| Left | Template name + the list of tasks. After roughly 7 tasks the list scrolls inside the modal so the modal height stays predictable. |
| Right | Multi-select checklist of all your active appointment types — tick every type that should use this template. |
| Field | Description |
|---|---|
| Template Name | The display name shown on the Checklist Templates card, in the appointment type dropdown, and on the appointment slide-over (e.g., "Standard Bridal Fitting") |
| Tasks | Ordered list of task labels. Click Add Task to append a row; the trash icon removes a row. |
| Assigned to Appointment Types | Multi-select. Assigning a template here is the same as picking it on the appointment type's edit form — both sides stay in sync. |
A single template can be assigned to multiple appointment types. Each appointment type can only point to one template (or none).
Editing and Deleting
Click Edit on any template row to reopen the modal. Editing a template's tasks affects future appointments only — completions already recorded on past appointments are preserved.
Click Delete to remove the template. Doing so clears the template assignment from any appointment types that referenced it. Existing appointments retain their recorded completions for the audit trail.
How Checklists Appear on Appointments
When an appointment is created from a type that has a template assigned, the appointment slide-over shows a Checklist section listing the template's tasks. See Appointments → Checklist for the full staff-facing behavior — ticking stamps the staff member's first name + timestamp, unticking removes the stamp, and every action is written to the appointment's activity log.