

Appearance
Products & Inventory Settings
Configure your lookbook display options, product defaults, and inventory alerts from Settings > Products & Inventory.
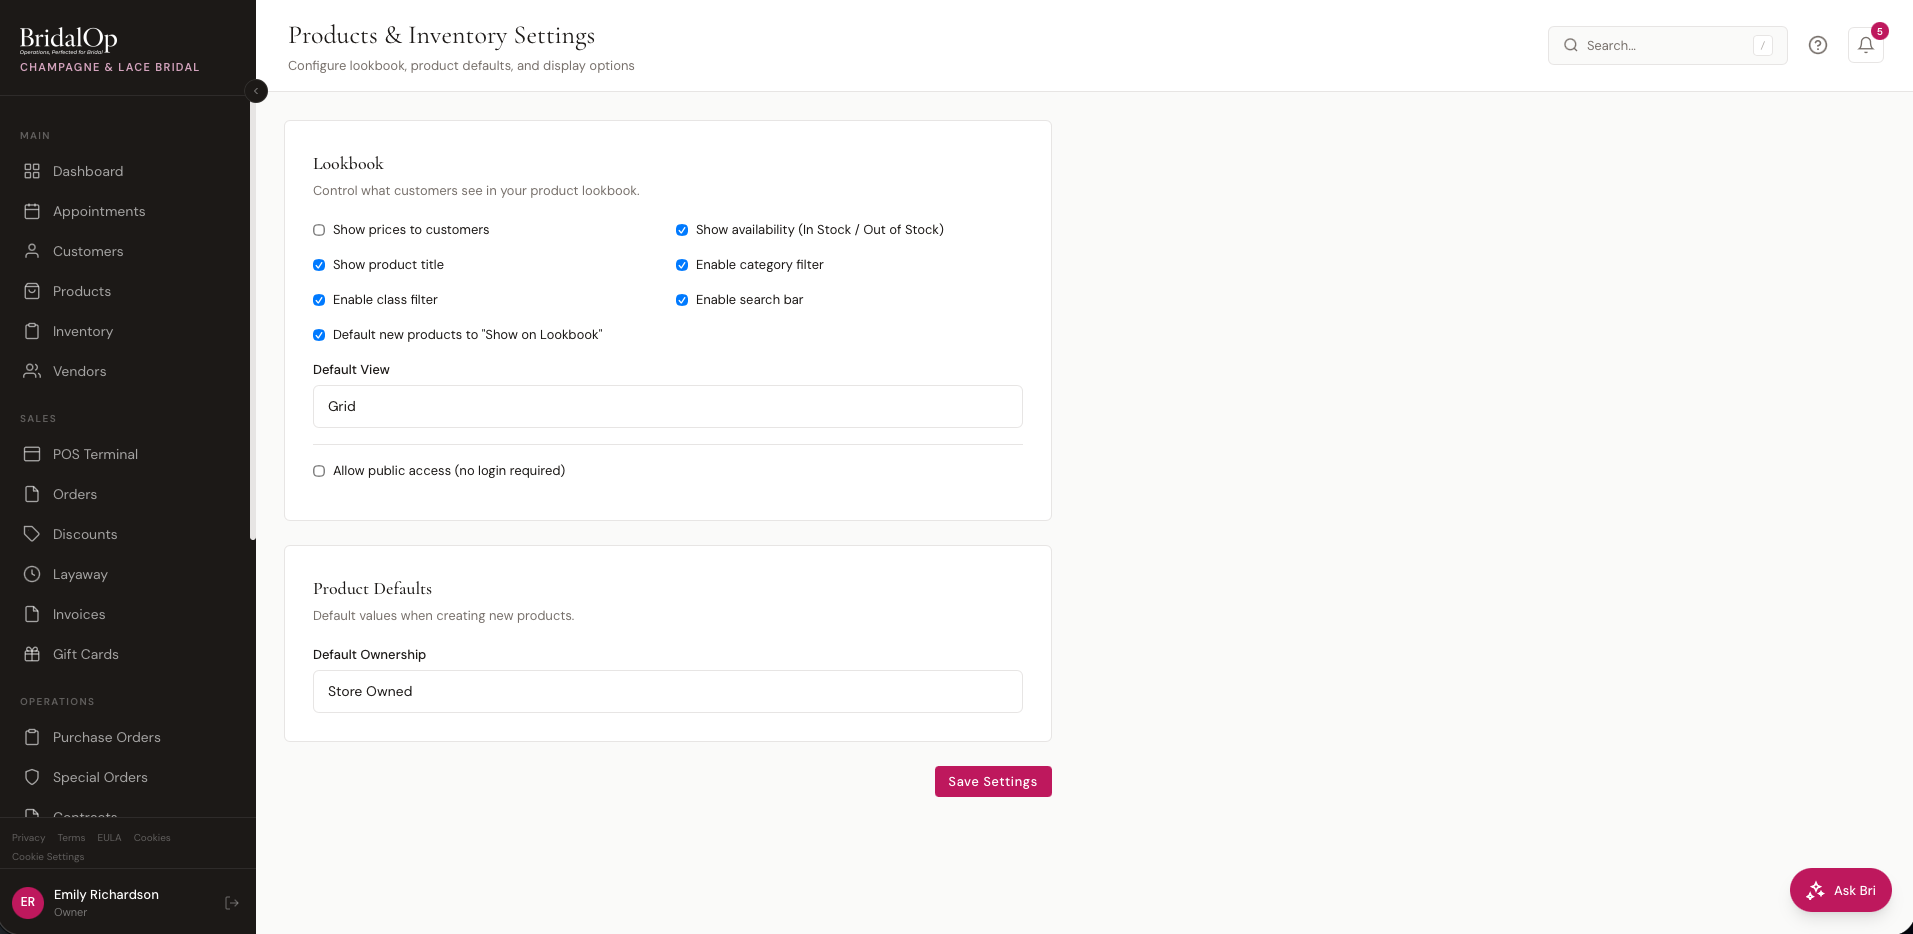
Lookbook
The Lookbook is a customer-facing product catalog where customers can browse your collection, filter by category or class, and mark favorites. It's available through the customer portal, and optionally as a public page that anyone can access without logging in.
Display Options
These toggles control what customers see when browsing your lookbook:
| Setting | Description |
|---|---|
| Show prices to customers | Display selling prices on product cards and detail views |
| Show availability (In Stock / Out of Stock) | Show inventory status badges so customers know what's available |
| Show product title | Display the product name on cards |
| Enable class filter | Add filter buttons for product classes (Gown, Bridesmaid, Shoe, etc.) |
| Enable category filter | Add filter buttons for your product categories |
| Enable search bar | Let customers search by product name, style number, or vendor |
| Default new products to "Show on Lookbook" | When checked, all newly created products are automatically visible on the lookbook. When unchecked, you must manually opt products in. |
The Lookbook Show on Lookbook flag is independent of the Show on Ecom flag (used by the public storefront). Both live on the product edit sidebar and are surfaced as LB (green) and EC (blue) badges on the products list — see Products → Visibility Badges.
Default View
Choose how products are displayed by default:
- Grid — card-based layout with product images
- List — compact table layout
- Masonry — Pinterest-style staggered grid
Public Access
Check Allow public access (no login required) to make your lookbook available to anyone — no customer portal login needed. When enabled, a public URL is generated that you can share on your website, social media, or anywhere.
Customers browsing the public lookbook can view products but must be logged into the portal to favorite items or add notes.
Product Defaults
Set default values that are applied when creating new products.
| Setting | Description |
|---|---|
| Default Ownership | Store Owned or Consignment — controls the default ownership type on the new product form. You can always change it per product. |
Categories
How your products are grouped — Bridal Gowns, Bridesmaid, Veils, Tuxedos, Accessories, and so on. The Categories card sits below Product Defaults on the Products & Inventory settings page.
Categories are worth getting right early, because the grouping shows up in more places than most people expect:
- The lookbook, where brides can filter by category
- The POS, when a consultant is finding a product
- Reports — Category Sales and Department Margin both group on it
- Vendor add-ons and lead times, which can be scoped to a category so a designer's rush charge on veils can differ from their charge on gowns
Adding one
Click + New category, type the name, and click Add.
Editing and ordering
Click Edit on any category to change its name and its sort order. Sort order is a plain number and lower numbers show first — so a category with sort 0 appears above one with sort 10. Categories sharing the same number fall back to alphabetical.
That ordering is what customers see on the lookbook, and what your staff see at the POS — so it's worth putting your best sellers at the top rather than leaving everything at zero and getting alphabetical order by accident. Left at zero, a category called "Belts & Sashes" opens the lookbook ahead of your gowns.
Each row shows how many products are assigned to it and its current sort number.
Empty categories don't show to customers
A category with nothing in it is left off the lookbook automatically, so you can set your structure up before you have stock without brides seeing empty shelves.
They do still appear in your own dropdowns at the POS and on the product form. If you find yourself scrolling past categories you never use, that's the sign to delete them rather than a reason to worry about what customers think.
Deleting
Click Delete. A category can only be removed once no products are assigned to it — if any remain, the deletion is refused and you'll be told how many are still attached. Reassign those products to another category first (the Products list has a bulk Change Category action for exactly this).
Categories can also be managed from the Products list
The same list appears under the Categories tab on Products. Either place edits the same set — this page adds the sort order, which is what controls the order customers see.
Special Order Deposits
What you take up front on a special order, and when the rest falls due.
| Field | Default | What it does |
|---|---|---|
| Deposit taken up front | 0% | The till fills this share of the gown into the payment box when you ring a special order. Leave it at 0 and nothing is pre-filled. |
| Balance due | 7 days | How long after the dress arrives the rest falls due. |
The deposit is a starting number, not a locked one — change it at the till for a bride who's a special case.
Marking a special order Received sets its balance due date from the arrival date plus that window, so nobody has to remember the rule or count the days. The Special Orders list shows what's owed and when, and the Special order balance overdueautomation fires the day it passes.
Orders Needing A Chase
Shows owners and managers a Needs Chasing card on the dashboard when an order has been taken but not placed, or sent to a vendor who never came back. It only appears when there's something on it.
| Field | Default | What it does |
|---|---|---|
| Watch for orders needing a chase | On | Switches the card off entirely. |
| Flag a customer's order after | 7 days | Days a special order can sit Pending, with no order date, before it's flagged. |
| Flag a purchase order after | 5 days | Days a submitted PO can go unacknowledged before it's flagged. |
The waiting periods are settings rather than fixed values on purpose. A shop that orders every Friday and one that orders the same afternoon disagree about what "late" means — and being told something is overdue when it isn't is exactly how a warning stops being read.
A purchase order that's been confirmed but has no expected date is flagged immediately, with no waiting period. It's wrong the moment it's confirmed, and waiting a week to say so helps nobody.
Low Stock Alerts
Get notified by email when a product or variant drops to its reorder point, so you can place a PO before you actually run out. The Low Stock Alerts card sits in the right column of the Products & Inventory settings page.
Enabling Alerts
| Setting | Description |
|---|---|
| Enable low stock alerts | Master toggle. When off, no alerts are sent regardless of the other settings. |
The When-to-send and Who-to-notify sections only appear when alerts are enabled.
When to Send
Choose how the alert email is delivered:
| Mode | Behavior |
|---|---|
| Notify immediately | An email fires within 15 minutes of an item dropping below its reorder point. Best for slow-moving inventory where every drop matters. |
| Daily restock summary | One email at 6 PM in your store's local time listing every item that crossed below its reorder point that day. Best for high-velocity inventory where one email per day is enough. |
Pick whichever matches how you actually work — both modes only count items that newly dropped below their reorder point. An item that was already low yesterday won't be re-flagged today.
Who to Notify
Tick anyone on your staff list who should receive the alert. The list includes a count of currently-selected recipients in the section header.
Pick the people who actually order inventory
Owners, managers, and consultants who handle restocking are the obvious candidates. Sales-floor staff who never touch POs probably don't need the email noise.
Fallback to store owner
If you enable alerts but don't select any recipients, BridalOp falls back to sending the alerts to the store owner. An amber notice on the card flags this so you don't accidentally leave alerts orphaned.
Setting Reorder Points
A product or variant only triggers an alert once you've set its reorder point — the threshold at which "available" inventory becomes "low". Set this on the product or variant edit page so BridalOp knows when to flag the item. Items without a reorder point set are never flagged.
Click Save Settings at the bottom of the page to apply changes from any of the three cards.