

Appearance
Special Orders
Special Orders track made-to-order or custom-ordered items for individual customers — from the moment they're requested through ordering, shipping, receiving, alterations, and pickup. Special Orders can be linked to Purchase Orders so status updates flow automatically.
Special Order List
| Column | Description |
|---|---|
| SO # | Unique number (e.g., SO-2026-0003) |
| Customer | Customer name |
| Product | Product name with size/color |
| Vendor | Vendor supplying the item |
| Status | Current status badge |
| ETA | Estimated arrival date |
| Retail Price | Customer-facing price |
| Balance | What's still owed on the sale, with the due date under it — red once that date has passed |
| Created | When the order was placed |
Search by SO number, vendor order number, designer style number, customer name, or product name. Filter by status or vendor.
Which dresses still owe you money
Tick Owes money to show only the ones with a balance outstanding, and a line at the top of the list tells you how many there are and what they add up to across every dress not yet collected.
This is the answer to the gown that arrives, goes on the rack while the bride waits to try it on, and is quietly handed over months later with the balance never collected.
The balance only appears for sales rung at the till
A special order created from this page has no sale behind it, so there is nothing recording what's been paid and the Balance column shows a dash. Ring special orders through the POS and the money follows the dress.
Bulk Create Purchase Order
You can create a Purchase Order from multiple Special Orders at once — a huge time-saver when you need to place a bulk order with a vendor.

- On the Special Orders list, check the boxes next to the special orders you want to include
- An action bar appears at the bottom showing "X special orders selected"
- Click Create Purchase Order
- BridalOp creates a new draft PO with one line per selected special order, each already linked to the correct customer
- Review and adjust the new PO, then submit it to your vendor
Click Clear Selection to deselect everything without creating a PO.
TIP
This works best when all the selected special orders are for the same vendor. The resulting PO groups them together so you can submit one order to the vendor instead of many individual POs.
Creating a Special Order
Click New Special Order to open the creation form.
Customer
Search and select an existing customer or create a new one inline. The customer's wedding date is pulled from their profile automatically.
Product & Variant
Select the product being ordered. If the product has variants, choose the specific one. The vendor and retail price auto-fill from the product record.
Item Details
| Field | Description |
|---|---|
| Size | Ordered size |
| Color | Ordered color |
| Designer Style # | Vendor/designer reference number |
| Measurements | Bust, Waist, Hips, Hollow to Hem, Height (all optional) |
| Measurement Notes | Additional fitting notes |
Dates
| Field | Description |
|---|---|
| Estimated Arrival | When you expect the item to arrive |
| Promised By | Date promised to the customer |
| Wedding Date | Pre-filled from customer profile |
| Vendor Order Number | Vendor's reference number for this order |
Financial Details
| Field | Description |
|---|---|
| Cost | Vendor/wholesale cost |
| Retail Price | Price charged to the customer (auto-filled from product) |
| Rush Fee | Additional charge for expedited ordering |
| Tariff / Import Fee | Customs or import duties |
The Total (Customer) is calculated as Retail Price + Rush Fee + Tariff Fee. The Margin shows Retail Price minus Cost.
Alterations
Check "Alterations Needed" if the item will need alterations after arrival. Add alteration notes describing what work is needed. This adds an extra step in the status workflow.
Special Order Detail
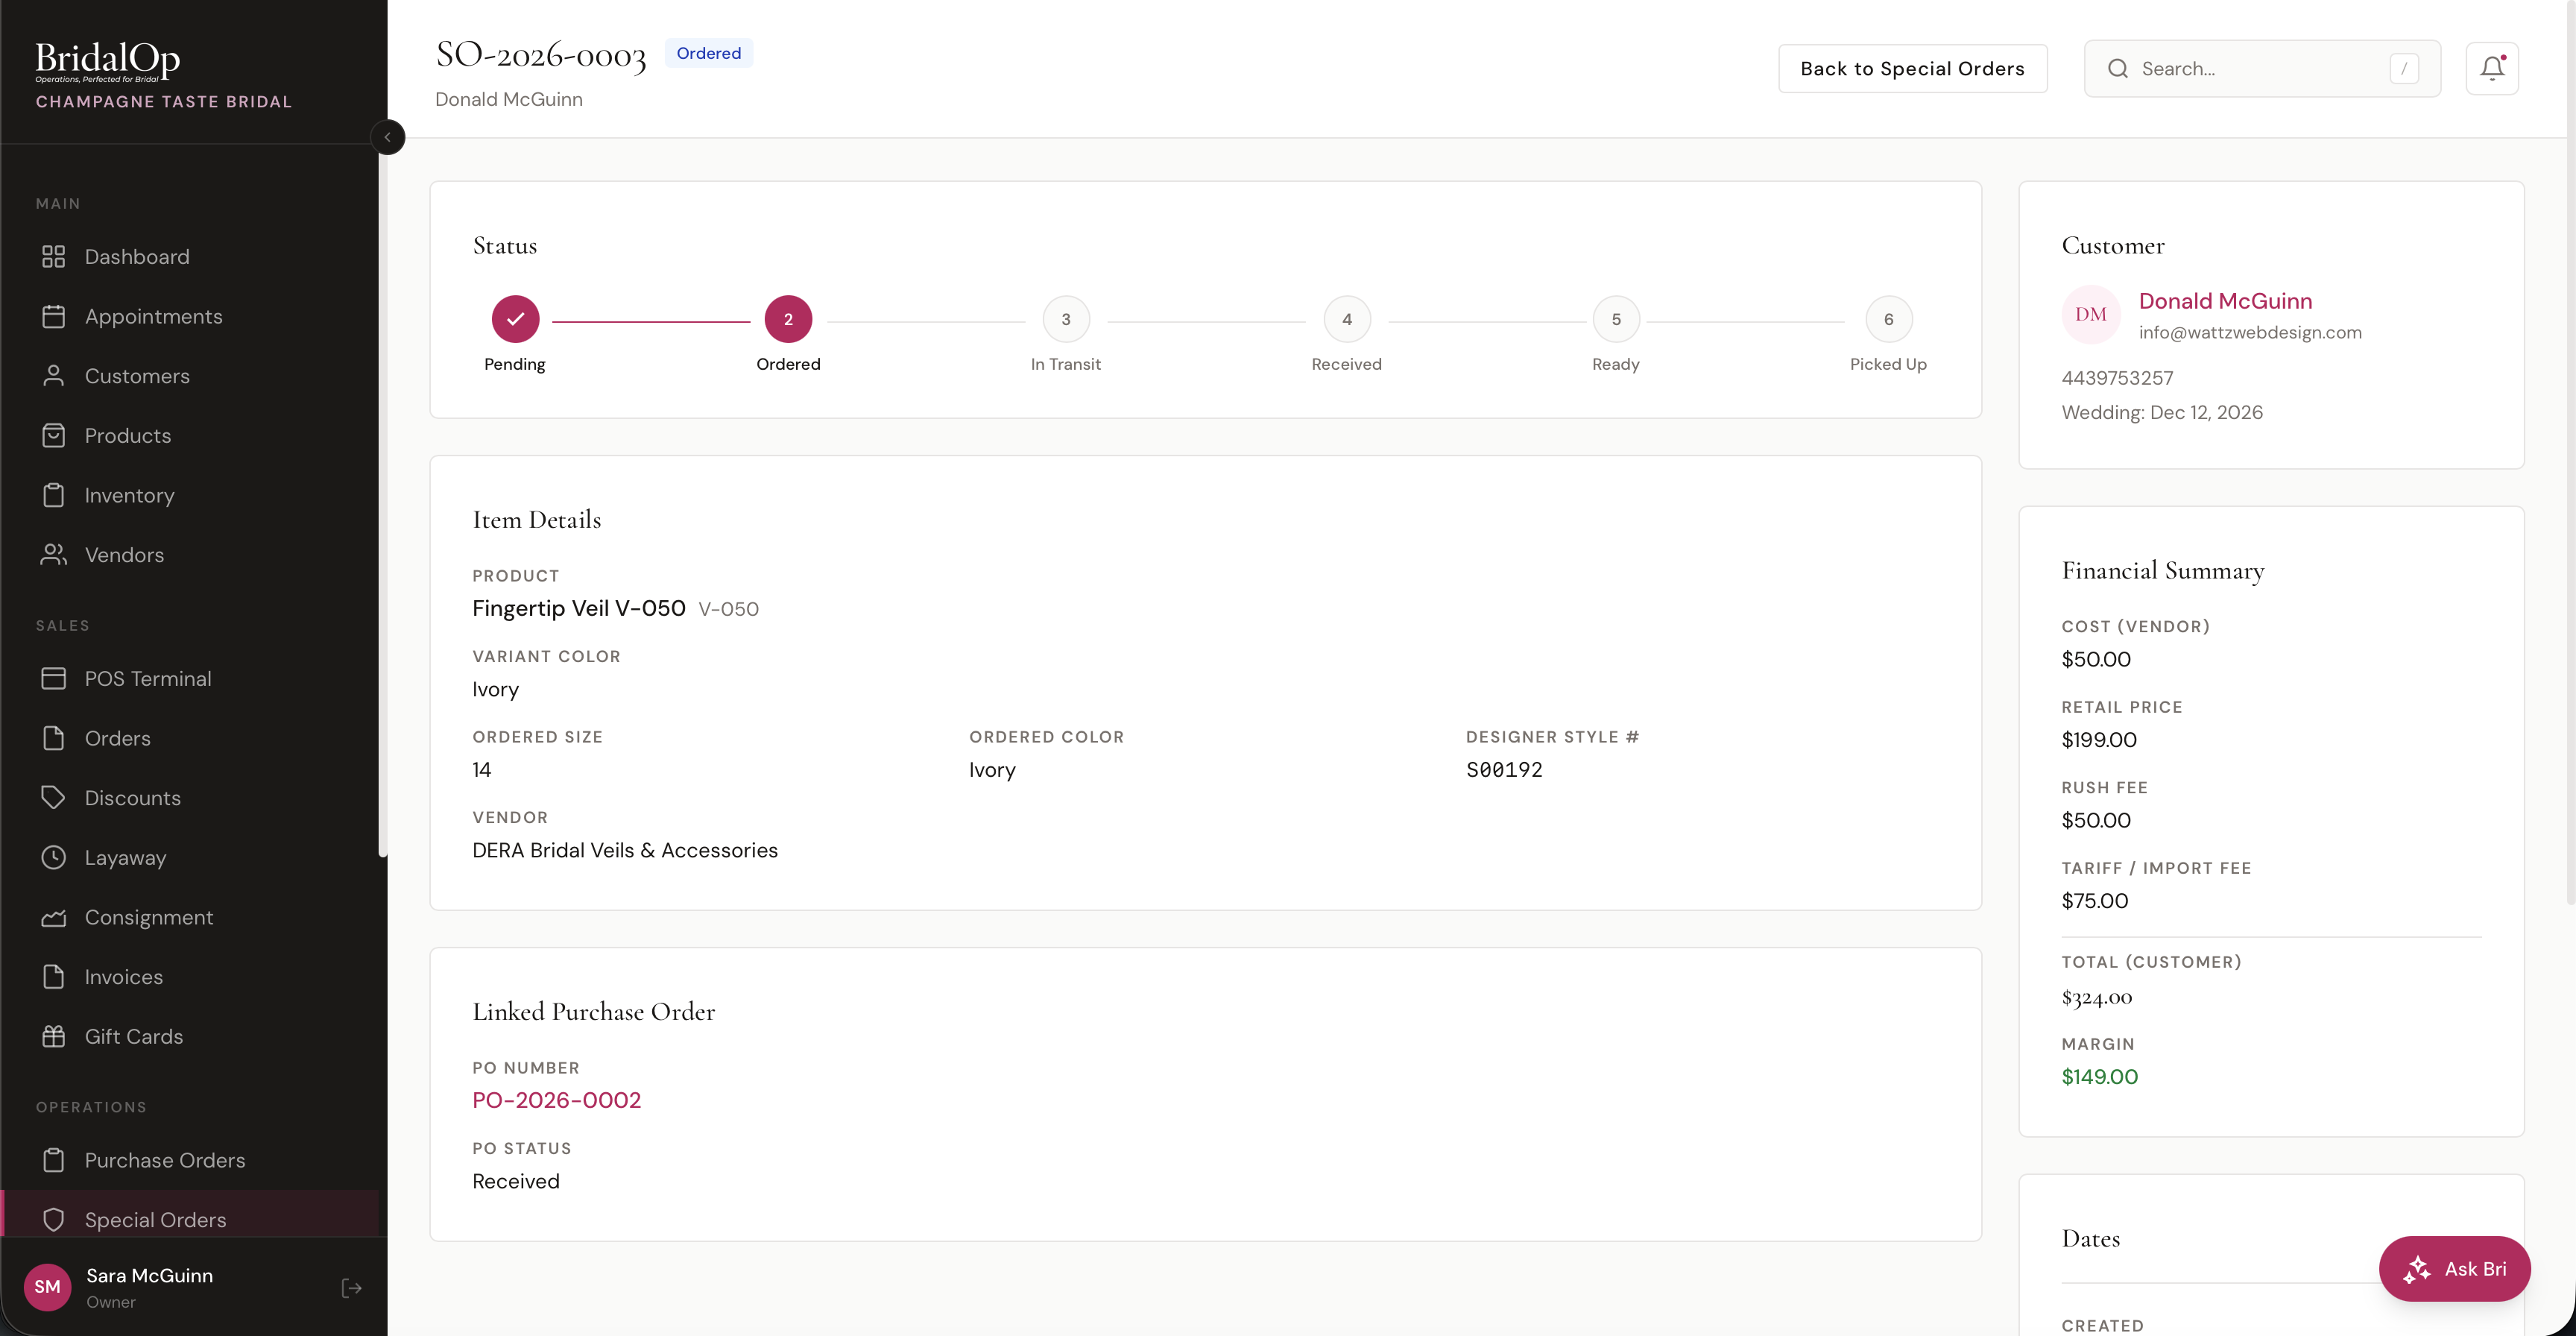
Click any special order to view its detail page.
Status Timeline
A visual stepper at the top tracks the order through each stage:
Pending → Ordered → In Transit → Received → Ready → Picked Up
If alterations are needed, an additional In Alterations step appears between Received and Ready. Completed steps show a checkmark, and the current step is highlighted.
Item Details
Shows the product name, variant, ordered size and color, designer style number, vendor, and all measurements.
Linked Purchase Order
If the special order is linked to a PO, this section shows:
- PO Number — clickable link to the purchase order
- PO Status — current status of the PO
- Tracking info — carrier and tracking number (if shipped)
Financial Summary (Sidebar)
- Cost (Vendor) — wholesale cost
- Retail Price — customer price
- Rush Fee — expedited charge (if applicable)
- Tariff / Import Fee — customs/import duties (if applicable)
- Total (Customer) — retail + rush + tariff
- Margin — retail minus cost (green)
- Balance Due — what's left to collect on the sale, and the date it falls due
Customer (Sidebar)
Avatar, name (linked to profile), email, phone, and wedding date.
Dates (Sidebar)
Wedding date, promised by date (highlighted red if past due), created date, ordered date, estimated arrival, received date, picked up date, and customer notified date.
Status Workflow
| Current Status | Next Steps | What Happens |
|---|---|---|
| Pending | Ordered, Cancelled | Waiting to be placed with vendor |
| Ordered | In Transit, Cancelled | PO submitted to vendor |
| In Transit | Received, Cancelled | Item shipped, tracking available via linked PO |
| Received | In Alterations or Ready, Cancelled | Item arrived — goes to alterations if needed, otherwise straight to ready |
| In Alterations | Ready, Cancelled | Item undergoing alterations (only if "Alterations Needed" is checked) |
| Ready | Picked Up, Cancelled | Item ready for customer — notification sent |
| Picked Up | — | Customer has collected the item (final) |
| Cancelled | — | Order was cancelled (final) |
Customer Notifications
When a special order is marked as Ready, you can check "Notify Customer" to automatically send an email and SMS letting them know their item is ready for pickup.
Automatic Date Tracking
BridalOp automatically records dates as the order progresses:
- Ordered → sets the ordered date
- Received → sets the actual arrival date, and the date the balance falls due
- Picked Up → sets the pickup date
- Ready + Notify → sets the customer notified date
The balance due date is the arrival date plus the window you set under Products & Inventory settings — seven days by default. Nobody has to remember the rule or count the days.
Once that date passes with money still owed, the Special order balance overdue automation trigger fires — once, on the day it tips over. See Automations.
Linking to Purchase Orders
Special Orders and Purchase Orders work together:
- Create the Special Order for your customer
- When you're ready to order from the vendor, create a Purchase Order and link the SO to a PO line item
- As the PO progresses (submitted → shipped → received), the linked Special Order automatically updates:
- PO submitted → SO advances to Ordered
- PO shipped → SO advances to In Transit
- PO item received → SO advances to Received
This eliminates the need to manually update special orders when inventory arrives. You manage the vendor side through Purchase Orders, and BridalOp keeps the customer's special order in sync.
Actions
| Action | When Available | What It Does |
|---|---|---|
| Update Status | Active orders | Advance to the next status in the workflow |
| Edit Details | Active orders | Update size, color, measurements, fees, dates, notes |
| Cancel Special Order | Any non-final status | Cancels the order |