

Appearance
POS Terminal
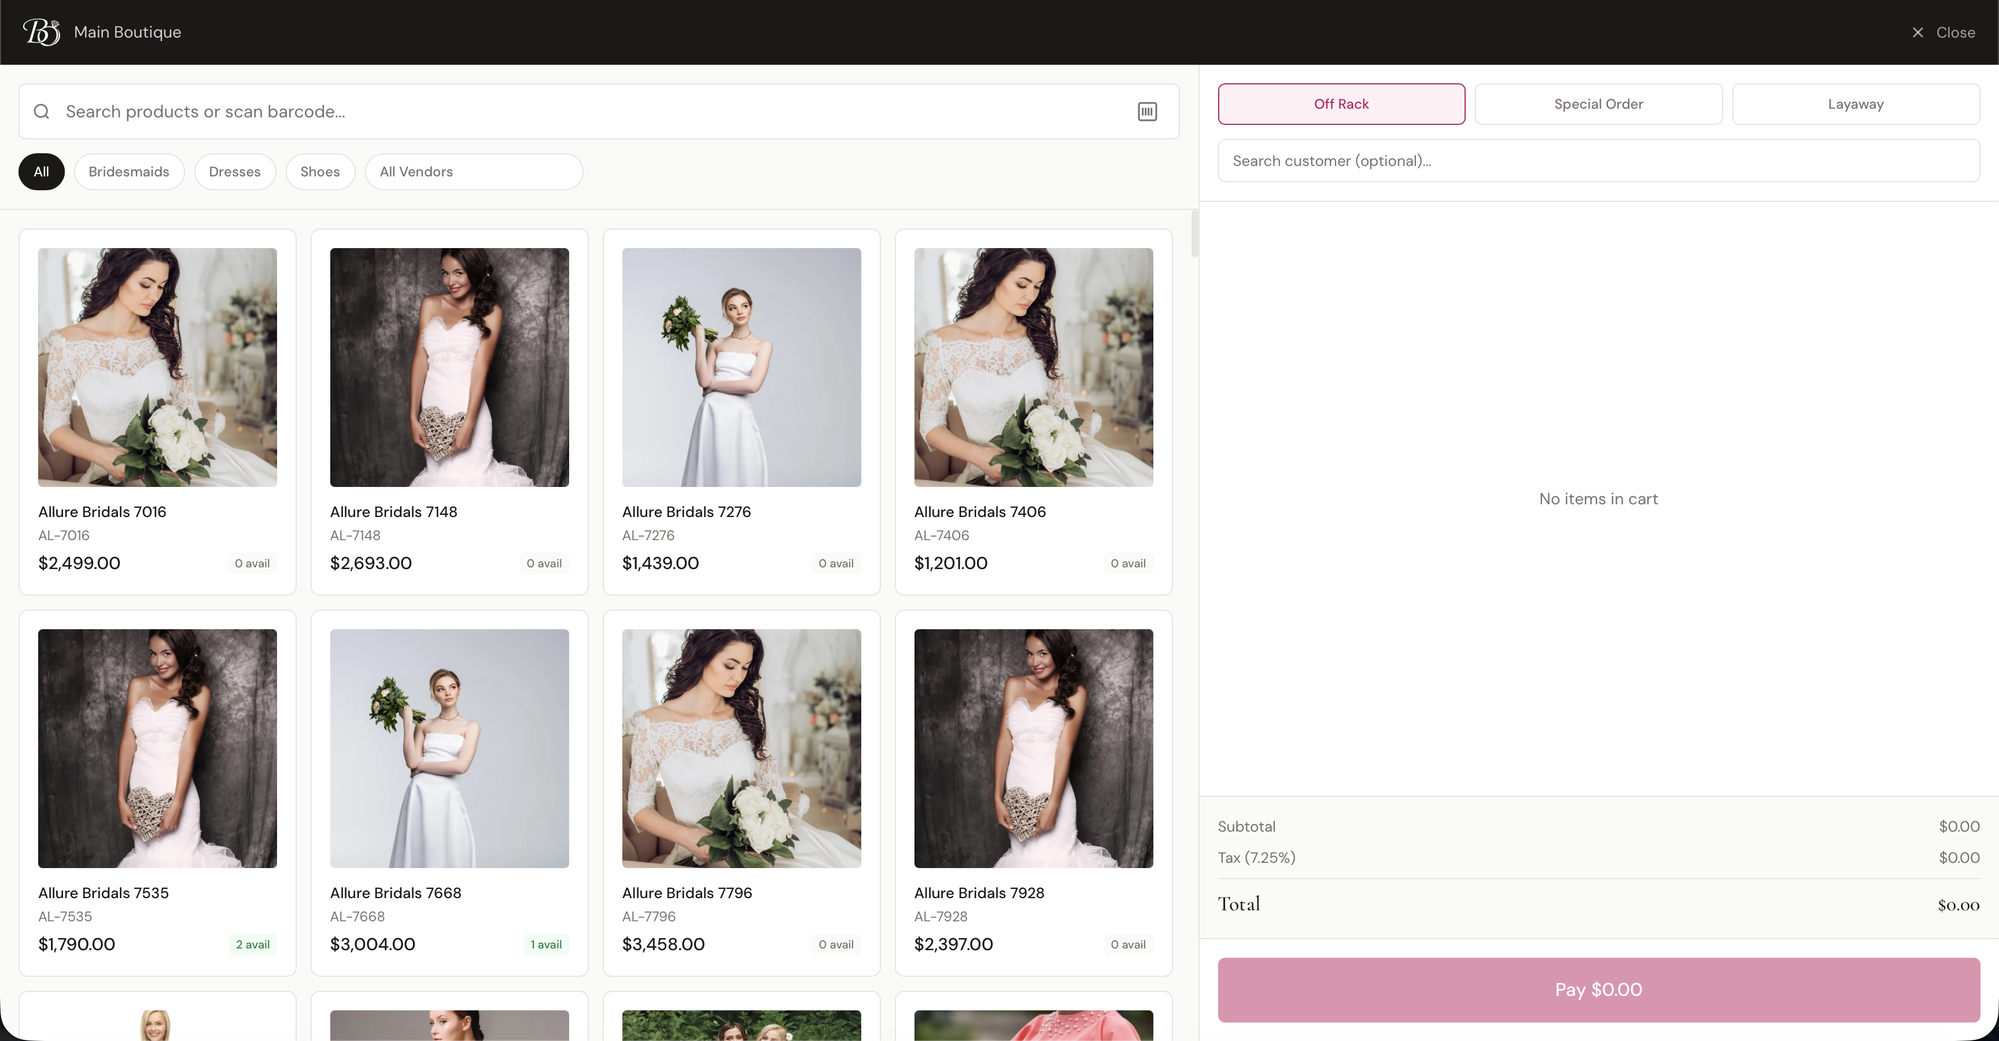
The POS Terminal is BridalOp's full-screen point of sale — where you ring up everything from a quick veil purchase to a special-order gown with measurements and a layaway plan. It's designed to handle the three sale types that bridal boutiques actually run: Off Rack, Special Order, and Layaway — all from the same screen.
Opening the POS
Click POS Terminal in the sidebar. The terminal opens full-screen with your current location shown in the top-left corner — this controls which inventory you can sell from and which tax rate gets applied to the sale.
To exit, click Close in the top-right corner.
The Three Sale Tabs
At the top of the cart panel are three tabs that determine what kind of sale you're running:
| Tab | When to Use |
|---|---|
| Off Rack | Standard in-stock sale — customer takes the item home today |
| Special Order | Custom order — you'll record the customer's measurements and order the dress from the vendor |
| Layaway | Customer pays a down payment now and the rest in scheduled installments |
You can switch tabs anytime before payment. Each tab changes the payment flow at checkout:
- Off Rack — collect full payment, mark inventory as sold, done.
- Special Order — requires a customer; opens a measurements modal at checkout; creates a Special Order record for each item.
- Layaway — requires a customer; collects a down payment, then opens a Layaway plan setup with installment frequency and dates.
Browsing Products
The left side of the terminal is the product browser.
Search & Barcode Scan
Use the search bar at the top to find products by name, SKU, style number, or vendor. The search updates as you type.
The barcode icon on the right of the search bar opens a camera-based barcode scanner. You can also scan a barcode with a USB scanner — BridalOp will detect the scan and look up the inventory item directly. If only one matching item is available, it's added to the cart instantly. If multiple items match, you'll be shown a picker.
Filters
Below the search bar are filter chips:
- All — show every product
- Category chips — one chip per category in your catalog (Bridesmaids, Dresses, Shoes, etc.)
- All Vendors dropdown — filter to a specific vendor
Filters combine with the search box, so you can narrow by category and vendor while searching.
Custom Item
Not everything you sell is in Products. A + Custom item button sits at the end of the filter row for the ones that aren't — something out of the jewelry case, an alteration charge, a piece of old stock from a vendor who no longer exists.
| Field | |
|---|---|
| Description | What it is. This is what prints on the receipt |
| Price | Zero is allowed — a comped item still belongs on the receipt |
| Quantity | |
| Type | Item, Service, Alteration or Fee |
| Taxable | On by default. Turn it off for something exempt, like a service |
It goes straight onto the sale and creates nothing in Products, so a one-off $12 tiara doesn't end up in the catalog for everyone to search past afterwards.
Product Cards
Each card shows the product image, name, SKU, selling price, and an avail badge showing how many units are in stock at your current location. Click any card to add it to the cart.
Selecting an Inventory Item
When you click a product, BridalOp checks how many physical units (inventory items) are available:
- One unit available — added to the cart automatically
- Multiple units available — opens the Select Inventory Item modal so you can pick the exact unit (by variant, condition, and barcode) you're selling
- None available — the product is added directly to the cart without linking to a specific inventory item. If the product has variants, the variant picker opens so you can select the size/color/length.
This matters because two units of the same dress can have different conditions (New vs. Floor Sample) and different prices.
Selling Without Inventory
Products with 0 inventory can still be sold at the POS — useful for special orders, services, or items you haven't received yet. The product is added to the cart at its selling price without reserving a physical inventory item.
The Cart
The right side of the terminal is the cart, with the customer selector at the top and the totals at the bottom.
Cart Lines
Each line shows the product thumbnail, description (with variant and condition), barcode, unit price, quantity, and a line total. You can:
- Apply a per-line discount — enter a dollar amount in the line discount field
- Toggle sales tax — a Tax checkbox on each line controls whether that line is taxed (see Per-Line Tax below)
- Remove a line — click the X icon
When an inventory item is added to the cart it's automatically reserved so it can't be sold to anyone else while you're ringing up the sale. If the order is abandoned, the reservation expires and the item becomes available again.
Add-ons
Each product line in the cart has an + Add-on button. Click it to open a modal listing all add-ons assigned to that product (set up on the product's Add-ons tab). Each row shows the add-on description and price — click to add it to the cart.
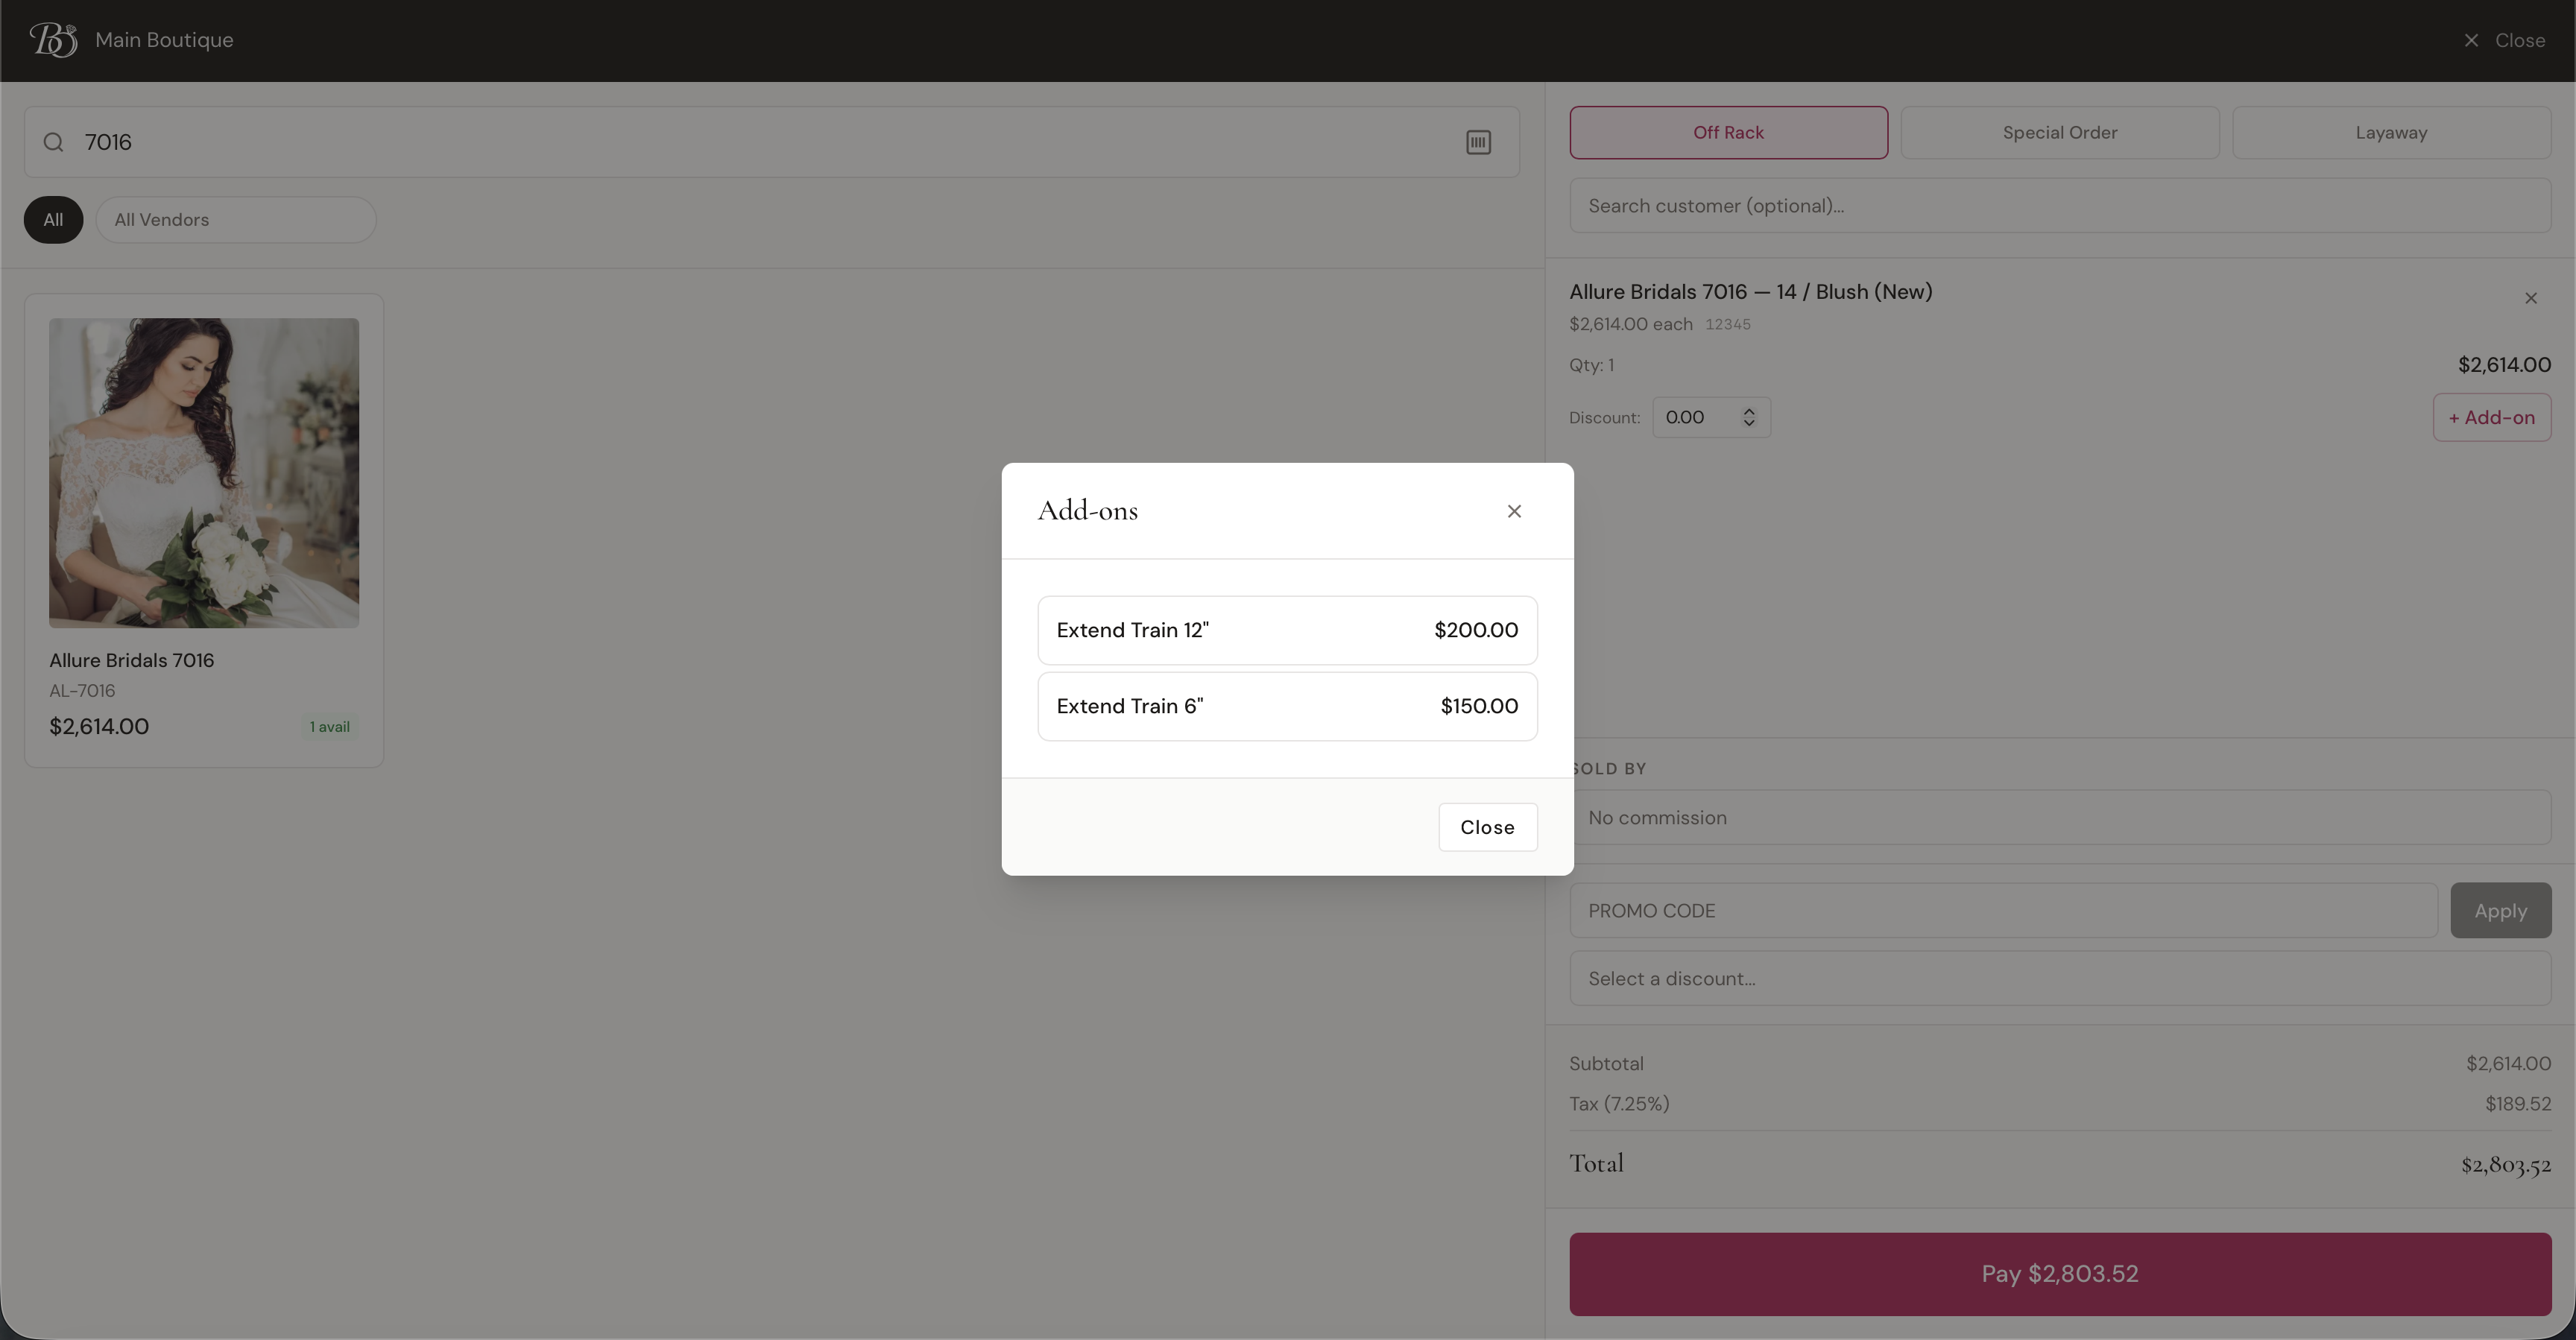
Add-on lines appear in the cart indented below the parent product with a gray background and an Add-on badge next to the description.
Default add-ons (marked as default on the vendor's profile) are automatically added to the cart when the product is added — no extra clicks needed.
Per-Line Tax
Every cart line has a Tax checkbox that controls whether that line is included in the taxable amount. It's pre-checked based on the product's Charge sales tax on this item setting (see Products → Sales Tax) — taxable products come in checked, tax-exempt ones (typically Service items like a Wedding Day Delivery fee) come in unchecked.
Tax is charged only on the checked lines. So a sale with a taxable gown and a non-taxable delivery is taxed on the gown alone — the delivery adds to the total but not to the tax. Uncheck (or check) a line's Tax box to override the product default for this one sale.
Cart Totals
At the bottom of the cart you'll see:
- Subtotal — sum of all line totals
- Discount — any cart-level discount applied
- Tax — calculated using your location's tax rate, applied to the taxable lines after discount. Only lines with the Tax box checked count toward the taxable amount (see Per-Line Tax); an order-level discount reduces that taxable base proportionally.
- Total — what the customer owes
Customer Selection
Special Orders and Layaways require a customer. Off Rack sales don't, but adding one tracks the order in the customer's history.
Searching for an Existing Customer
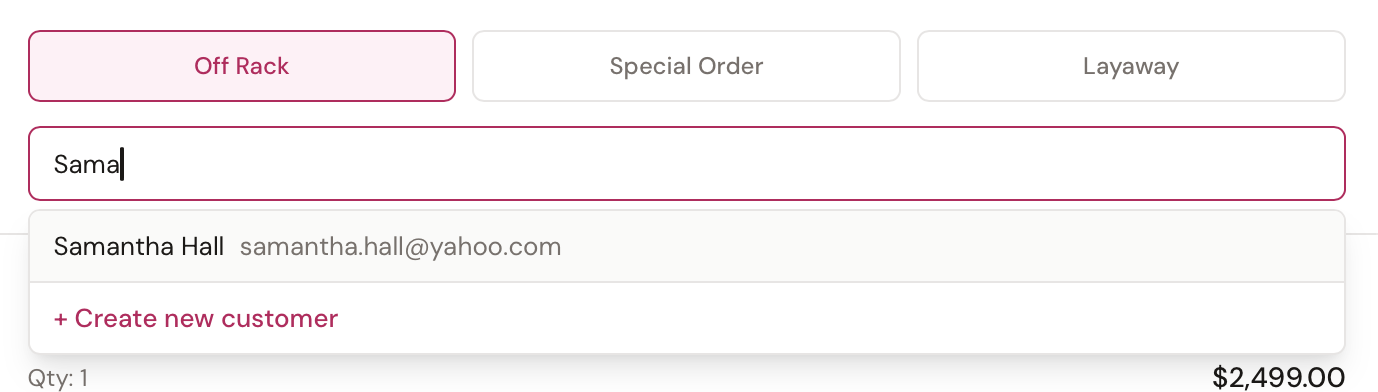
Click the Search customer (optional)… field at the top of the cart and type at least 2 characters. BridalOp searches by name and email. Click a result to attach them to the sale.
Creating a New Customer Inline
If you don't find the customer, click Create new customer at the bottom of the search dropdown to open a quick-create form:
| Field | Required |
|---|---|
| First Name | Yes |
| Last Name | Yes |
| No | |
| Phone | No |
Click Create Customer and BridalOp creates the customer record and attaches them to the sale in one step. You can fill in the rest of their profile later from the Customers page.
Removing a Customer
Click Remove next to the selected customer's name to clear them from the sale.
Prom Clashes
With the Prom module on and a customer attached who has a school on her record, dresses already spoken for at that school are badged in the product grid. Your consultant can see it without clicking into anything.
If one reaches the cart anyway, a note appears above the cart lines naming the dress and the school.
At payment
The last line of defence, and it behaves according to your enforcement setting:
| Setting | What happens at payment |
|---|---|
| Warn | A prompt naming the dress, who has it (first name and last initial) and since when. Staff can sell it anyway, giving a reason. |
| Block | Only the roles you've allowed can override. Everyone else is stopped. |
| Off | Nothing interrupts; the sale is still registered. |
Every override is recorded with its reason and shows in the Prom Registry, so an owner can see whether the promise is actually being kept.
If the customer has no school on her record and you've set BridalOp to require one, payment stops until it's added.
This should almost never fire
By the time a dress reaches the till, the product page and the grid badge have both had a chance to catch it. If your team is meeting this prompt often, that usually means schools aren't being filled in on customer records.
Sold By (Commission)
If your boutique uses commissions, a Sold By dropdown appears in the cart once an order is started. Pick the staff member who should receive commission credit for this sale, or leave it as No commission.

The Sold By staff member is separate from whoever is logged in and ringing up the sale — owners and managers often ring up sales without crediting themselves commission.
Once the order is fully paid, the commission is locked in and tracked in the Staff commissions report.
Discounts
There are two ways to apply a discount in the cart, and they behave differently:

Promo Code (Customer-Facing)
The Promo Code input lets the customer redeem a code they were given (e.g., from a marketing email). Type the code, click Apply, and BridalOp validates it against your active discounts. If the code is invalid, expired, or the order doesn't meet the minimum, you'll see an error message.
Select Discount (Staff-Facing)
The Select Discount dropdown lets staff pick from a list of all currently active discounts — handy for applying a one-off staff discount or a sale promo without the customer needing to know a code.
Both methods apply the same way to the order — the difference is just how the discount gets onto the cart.
Line-Item vs. Order-Level
- Order-level discount — applies to the whole order subtotal (set via promo code or select dropdown)
- Line-item discount — applies to a single line (set via the discount field on each cart line)
Both reduce the taxable amount, so tax is calculated on what's left after all discounts. See Discounts for setting up the discount rules themselves.
Attaching a Contract
Many bridal sales — especially special orders and layaways — need a signed agreement before payment. BridalOp lets you attach a contract to the sale right from the POS.
Once a customer is selected and the cart has items, click Attach Contract. You'll be able to:
- Pick a template from your active contract templates
- Set a title (pre-filled from the template)
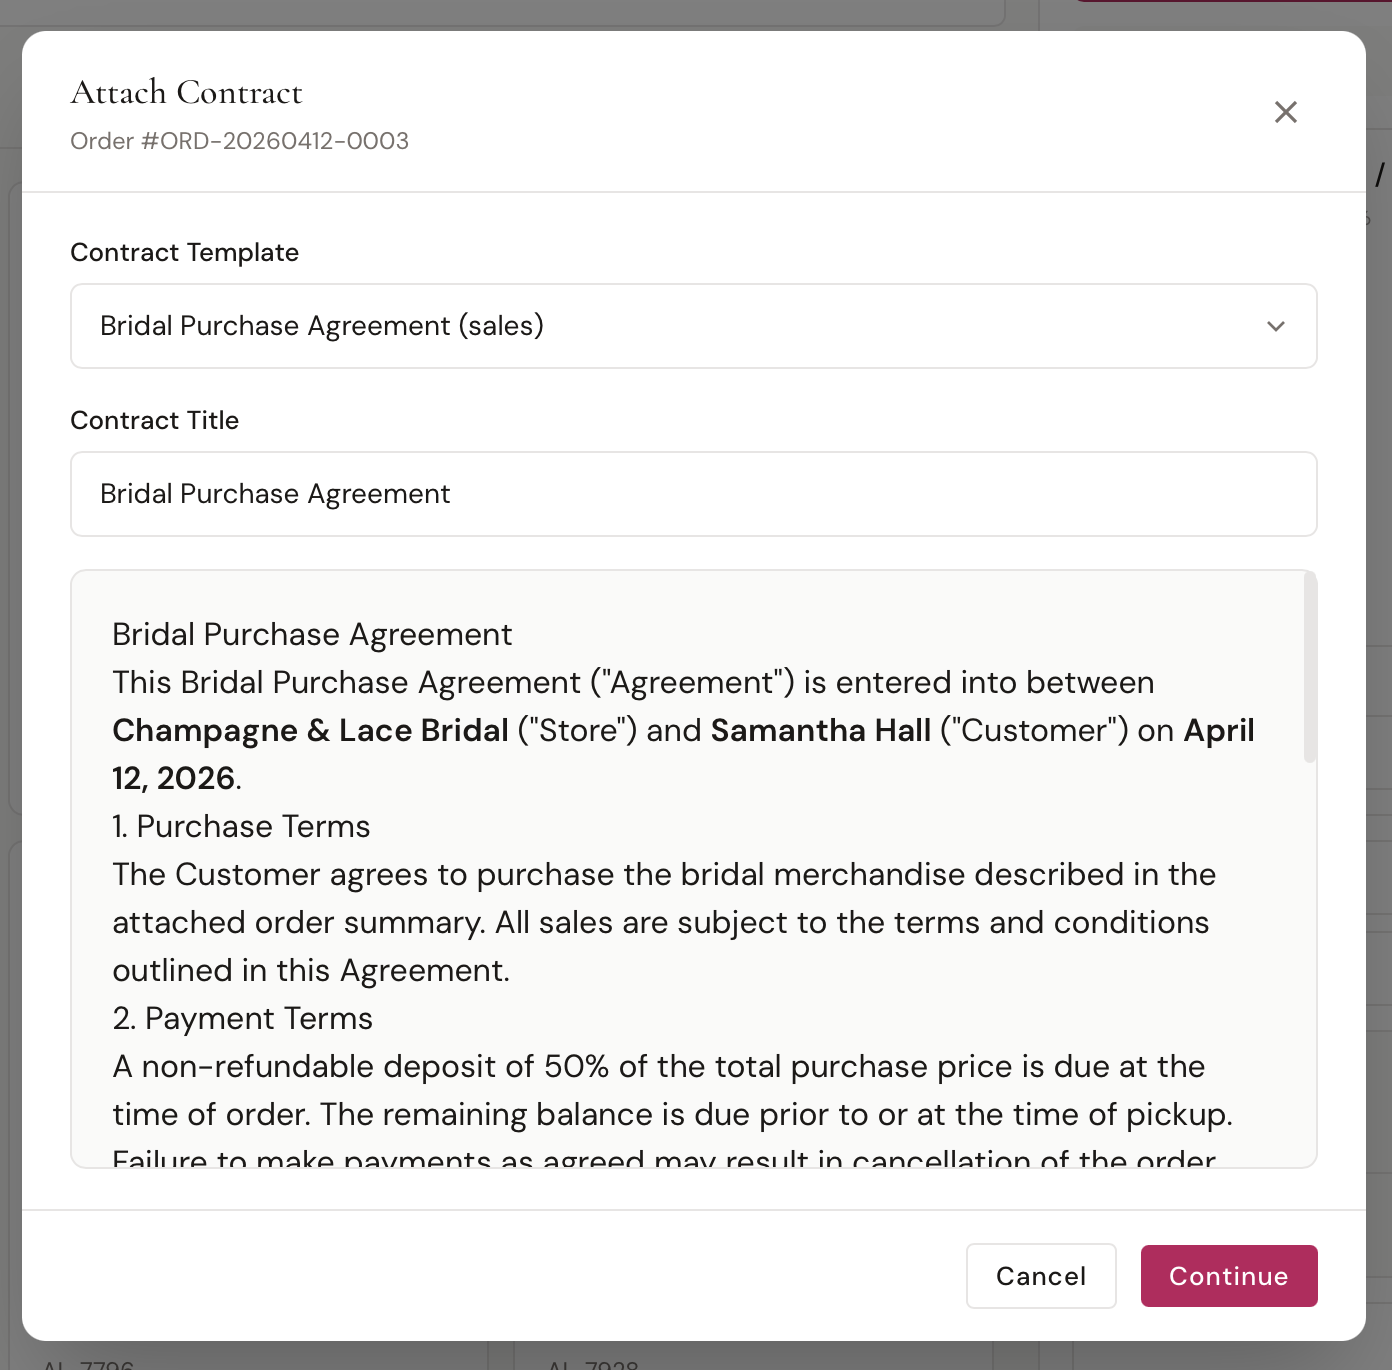
- Choose how it gets signed:
- Sign Now — customer signs on-screen with a typed or drawn signature
- Send for Signing — emails the customer a signing link, and BridalOp polls for completion in the background
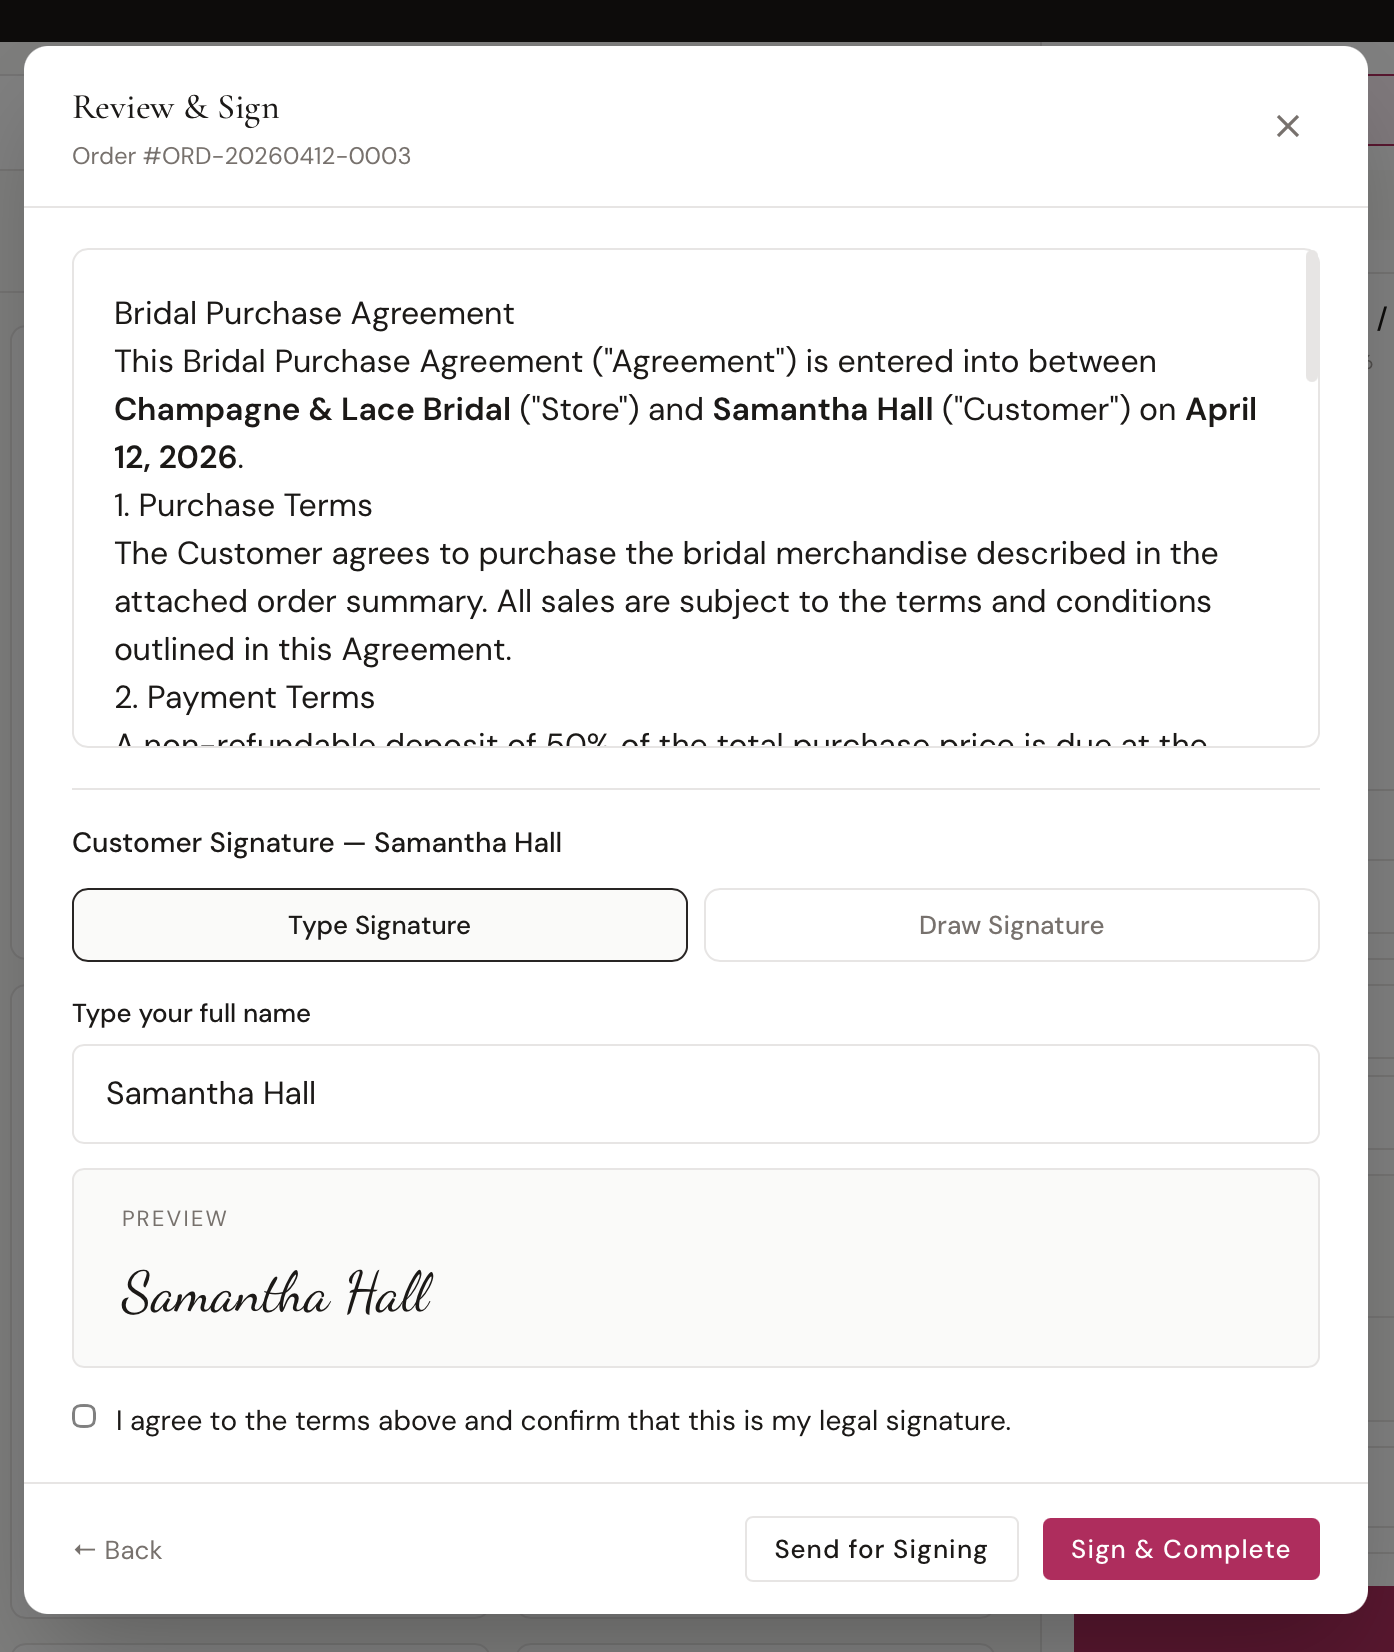
The contract pulls in merge tags for the customer, store, order, and (for special orders) measurements automatically.
If a contract is attached but not yet signed, the Pay button is disabled and a warning shows in the cart — you have to wait for the signature (or remove the contract) before you can take payment.
Payment
Click Pay $XXX at the bottom of the cart to start checkout.
Off Rack Payment
The Payment modal opens immediately. Choose a payment method:
| Method | Notes |
|---|---|
| Cash | Enter the amount tendered; BridalOp shows change due |
| Card | Charges through your connected payment gateway (terminal or in-app) |
| Card on Reader | Sends the charge to a paired Card Reader — only shown when at least one reader is paired for the active gateway |
| Card on File | Pick from saved cards if the customer has any |
| Gift Card | Enter the gift card code; BridalOp looks up the balance and applies it |
| Other | Check or alternate methods |
You can split payment across multiple methods until the balance reaches zero. When the order is fully paid, all reserved inventory items are marked Sold and the order is Completed.
Taking part of the money in dollars or a percentage
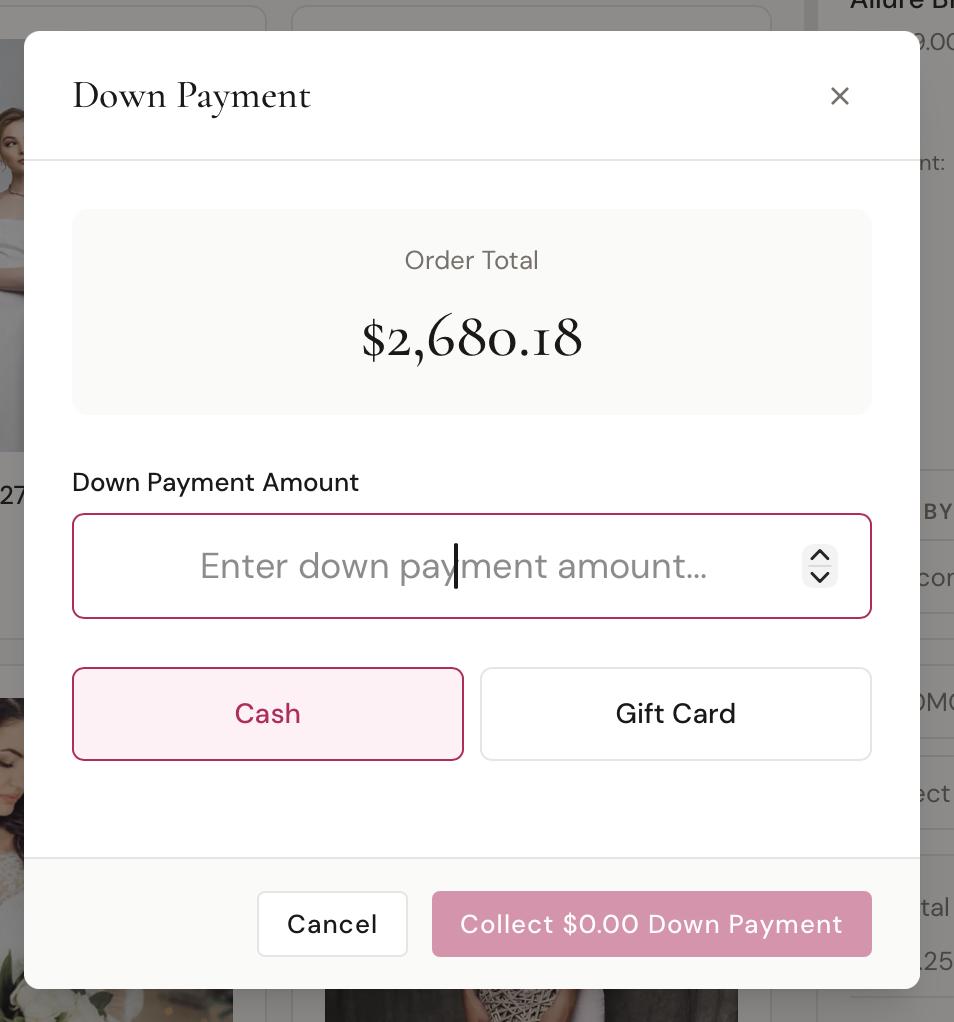
Amount to pay takes either. The $ / % switch next to it means "50% down" is two keystrokes rather than a sum at the counter: type 50, press %, and it shows you what that comes to — "50% of $2,400.00 is $1,200.00" — before you commit to it.
It works the same way on a layaway down payment, and on a special-order deposit. Whatever you type, the percentage turns into money before it reaches the order, so nothing downstream is holding a percentage.
Leave the box blank to take the whole balance.
Coming back to it later
You don't have to finish a sale in one go. Take a deposit, let the customer leave, and the order stays Active with the balance showing. Reopen it from Orders when she comes back — the button carries the amount still owed — and it completes itself once that reaches zero.
Special Order Payment
Clicking Pay first opens the Special Order Details modal where you can enter:
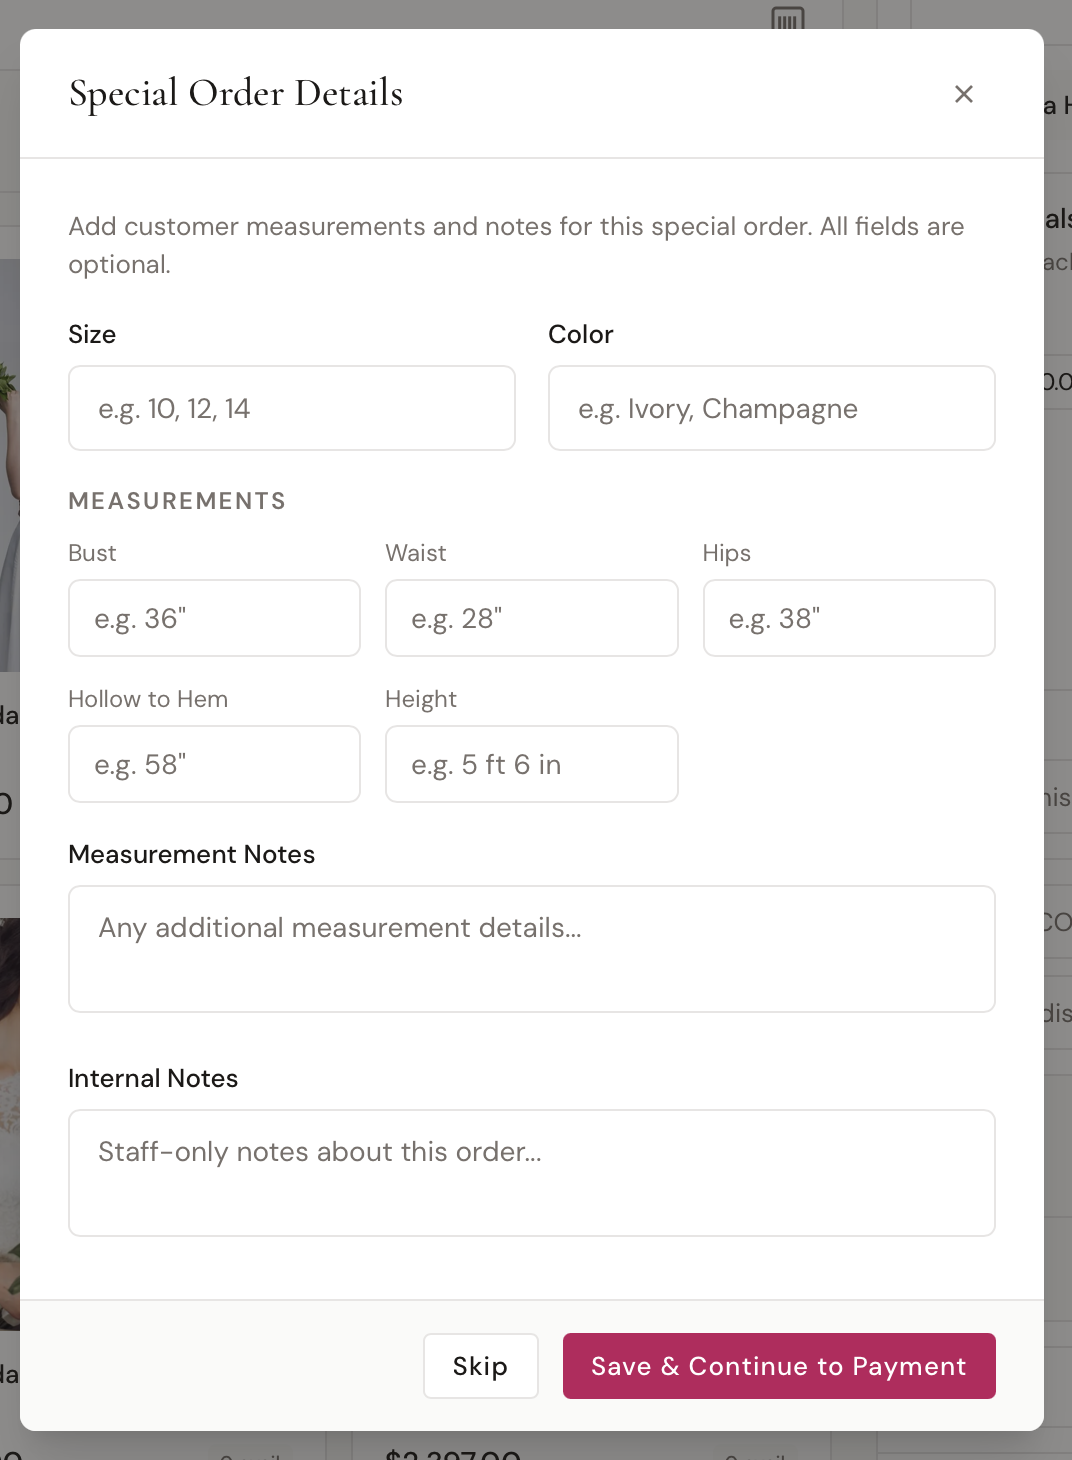
- Size and Color
- Measurements — Bust, Waist, Hips, Hollow to Hem, Height
- Measurement Notes (visible on the special order)
- Internal Notes (staff-only)
All fields are optional but capturing them up front avoids chasing the customer later. After saving, the regular Payment modal opens. Once payment is taken, BridalOp creates a Special Order record for each product line, attached to the customer.
Layaway Payment
The Payment modal lets you collect just the down payment rather than the full total.
After payment goes through, the Set Up Layaway Plan modal opens with:
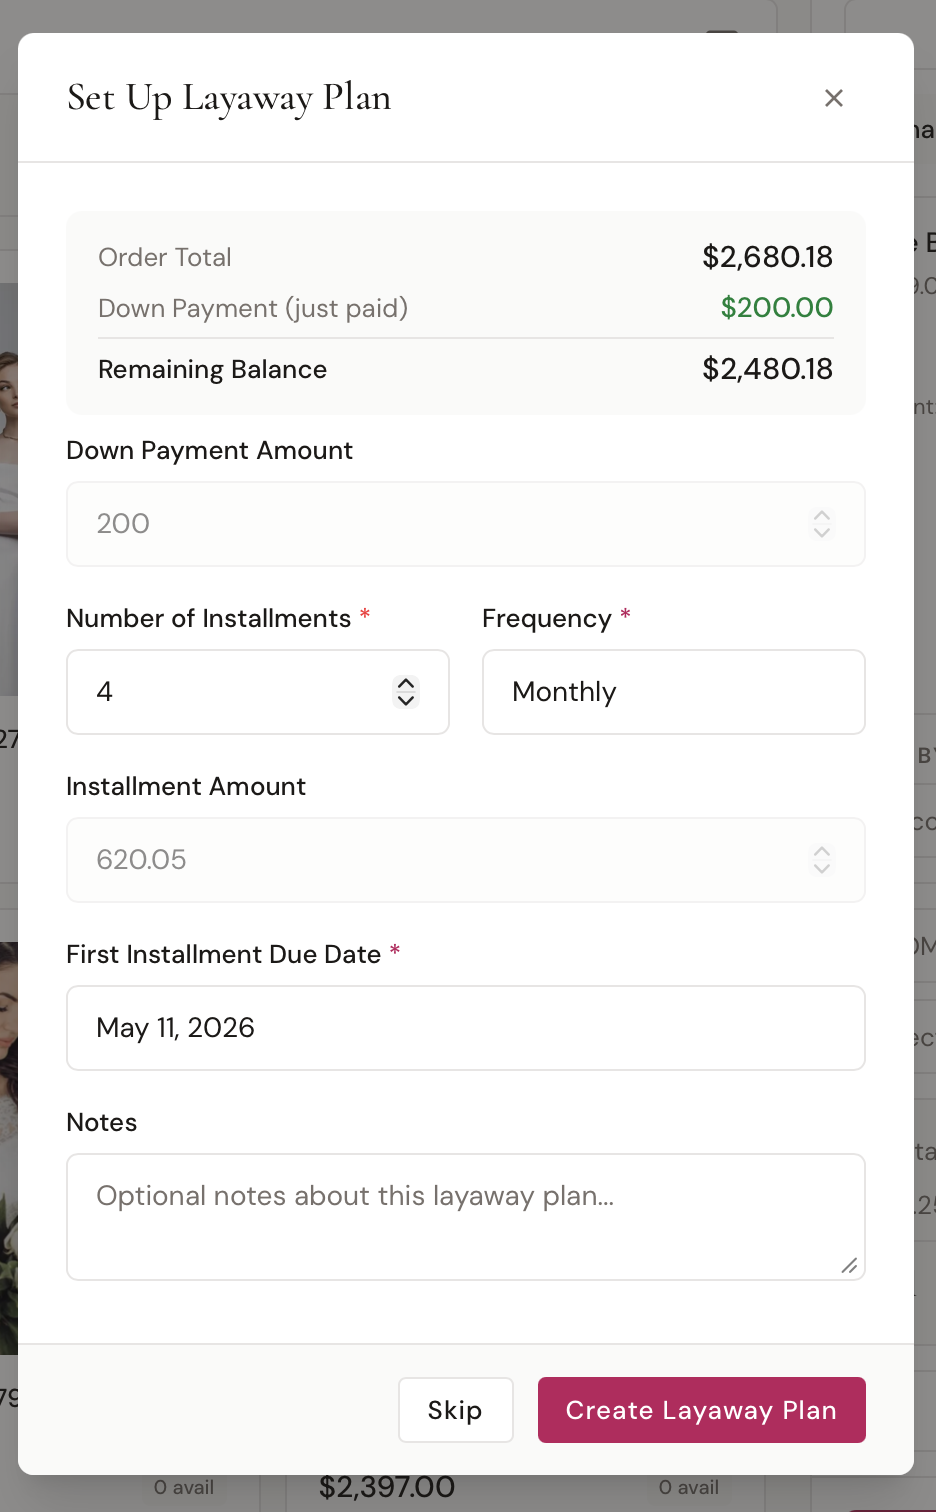
| Field | Default |
|---|---|
| Down Payment | The amount just paid (locked) |
| Number of Installments | 4 |
| Frequency | Weekly / Biweekly / Monthly |
| First Due Date | 30 days out |
| Installment Amount | Auto-calculated from (Total − Down) ÷ Installments |
| Notes | Optional |
Click Create Plan and BridalOp creates a Layaway plan, schedules the installments, and emails the customer a confirmation.
After Payment
Once payment is complete, the cart switches to a Payment Complete confirmation screen showing the order number and total paid.
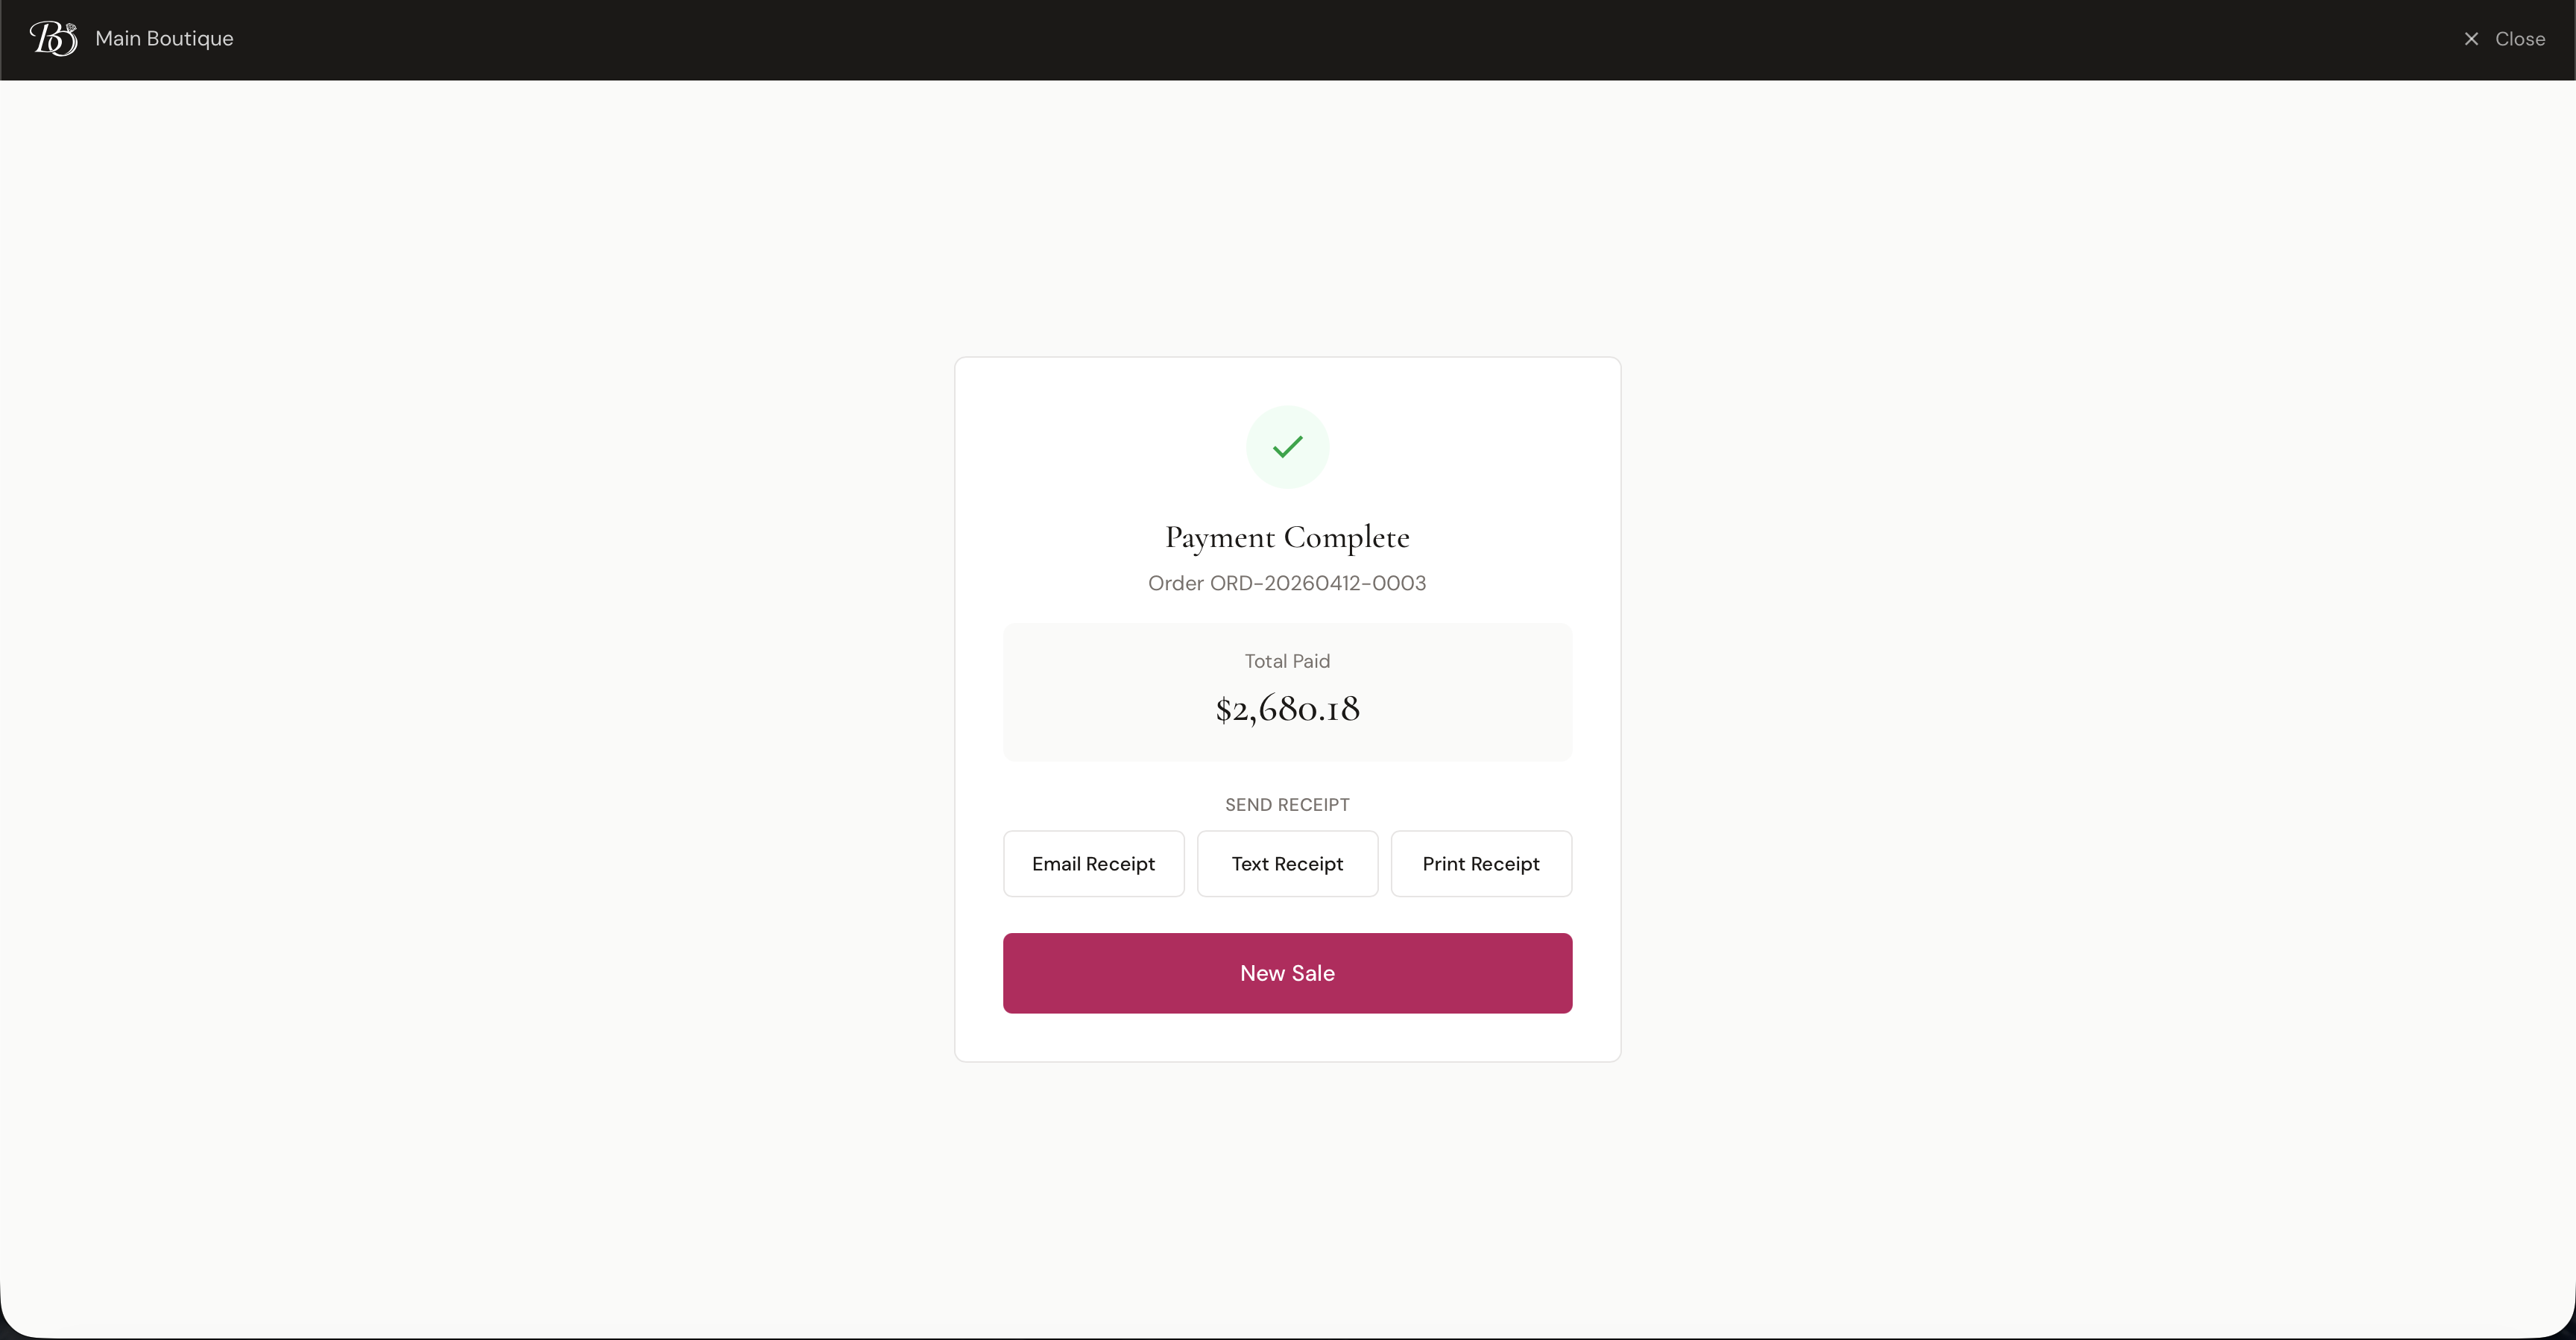
From here you can:
- Email Receipt — send the receipt to the customer's email
- Text Receipt — send the receipt by SMS (uses SMS credits)
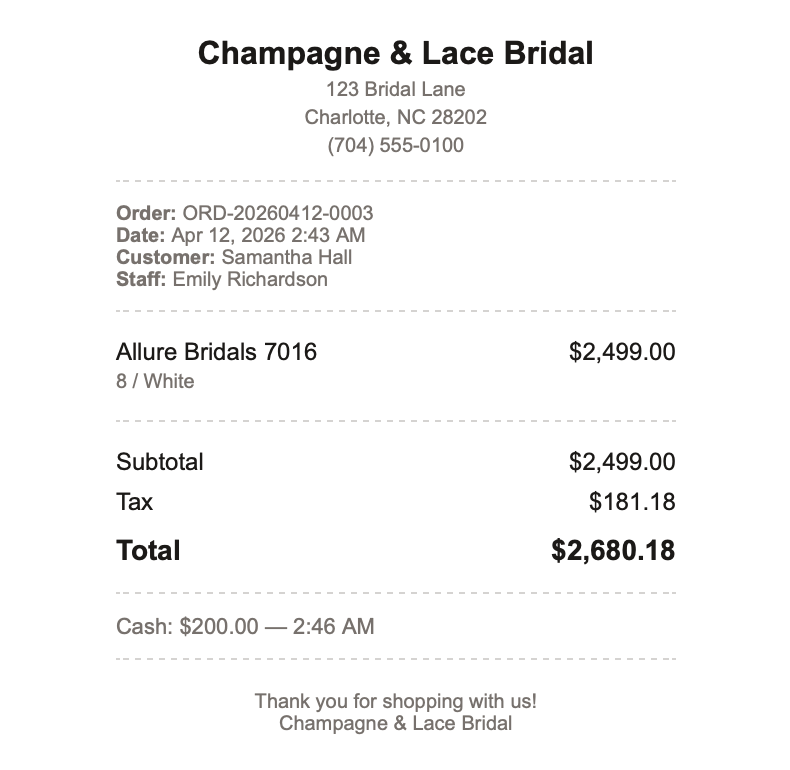
- Print Receipt — open a print-friendly receipt window
Click New Sale to clear the cart and start fresh.
Resuming a Draft Order
If you start an order in the POS and step away (or close the terminal) without paying, the order is saved as a draft. You can resume it from the Orders page by clicking Continue in POS on any draft order. The cart, customer, and any attached contract are restored exactly as you left them.
Reserved inventory on draft orders has a timeout — once it expires, the items become available again so you don't accidentally hold inventory hostage.
How POS Connects to the Rest of BridalOp
- Products & Inventory — what's available to sell at your current location
- Customers — attach a customer or create one inline
- Discounts — promo codes and staff-facing discounts
- Gift Cards — accepted as a payment method
- Contracts — attached and signed during checkout
- Orders, Special Orders, Layaway — created automatically based on the sale type
- Staff — Sold By assignment drives commission tracking